TS100 Soldering Iron Review
by John Salt - Updated September 2023
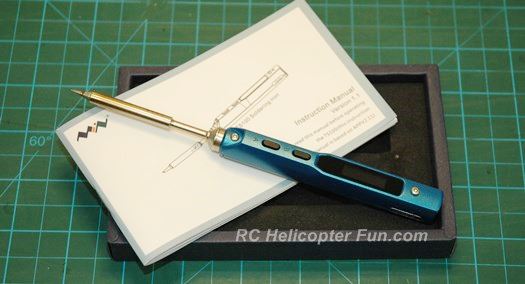
I finally picked up a TS100 soldering iron after hearing so many great things about these little powerhouse irons. Were they exaggerations or on the mark? Here's my take after using this little iron extensively over the past month.
I'll start by saying I can't get over just how much I like this little iron. You have to like something a fair amount after all to do a boring tool review on it. I'm actually excited to talk about the Miniware TS100 soldering iron and when was the last time anyone got excited about a boring old soldering iron?
The TS100 is anything but boring!
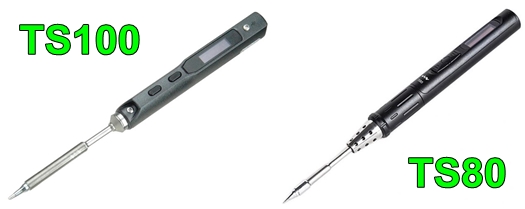
It will change the way you look at soldering irons and even soldering stations. Before getting to why that is and what makes it so special; let me first cover why I chose it over the newer (and some would argue better) TS80 soldering iron. After all, you as an RC modeler may like features of the TS100 better as well.
TS100 Soldering Iron vs. TS80
First off, both are amazing little digital soldering irons.
They are controlled by a 32bit ARM microprocessor with a crystal clear OLED display. Both are easy to use, have crazy fast response times, deadly accurate temperature control, direct drive cartridge tip technology, and are very powerful for their size, not to mention being very portable.
These are not the crappy useless battery powered mini soldering irons of yesteryear - these things actually work! Almost as well as professional direct drive cartridge tip soldering stations such as the Hakko FX 951.
The TS100 is in my opinion, much better suited to RC hobby use. In fact, it's almost like they exclusively had the RC hobbyist in mind when they designed it.
1. Powerful:
The 65W TS100 is over three times as powerful as the 18W TS80. This is the primary reason I choose the 100 over the 80. I didn't just want, but I needed a portable iron that would have the power to solder up to 10 gauge high flex silicone wiring and RC connectors out at the field.
The TS100 will do up to 8 gauge I found out (with amazement I should add), whereas the TS80 will top out around 12 gauge. I also wanted a powerful portable iron for automotive, shop, and around the yard use as well - projects are limitless provided you have the power.
2. RC Friendly Voltage Range:
Second big factor was powering the iron. The TS100 has a 12VDC to 24VDC power input range. The TS80 is half that at 3.6 to 12V.
This means RC'ers can conveniently power the TS80 from a 3S RC LiPo battery all the way up to 6S Lipo. Most of us electric RC'ers will have easy access to that voltage range while out flying or driving.
Even turbine, gas and nitro powered folks could power the iron from a 12V vehicle battery or RC field box 12V battery. You do need the full 24 volts however to get the full 65W of power out of the TS100 soldering iron if you need to do massive 8 gauge wire.
3. Common & Robust Power Connection:
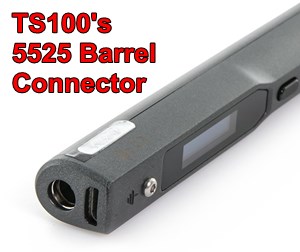
The power connection is also better in my opinion on the TS100 for rough field use.
It uses an inexpensive and robust 5525 standard barrel jack connector.
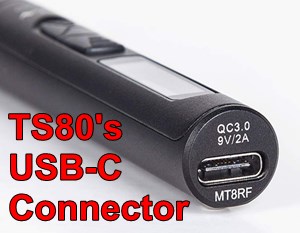
The TS80 uses an expensive and less robust USB Type C connector.
The 100's 5525 barrel jacks on the other hand are readily available and two conductor simple; making it easy to replace or build your own custom powering harnesses for it.
4. Better Value:
Lastly, the TS100 is less expensive at around $60 USD compared to $80 USD.
Now, I don't want to put the TS80 down because it's an amazing little soldering iron as well. It's actually got a better aluminum body, it's slightly nicer to hold, and with the slightly shorter tips, nicer to do fine circuit board work. The way the cartridge tips slide into the TS80 iron is also a little nicer.
The TS80 is better suited for electronic hobbyists in other words that won't likely be soldering up big 10 or 8 gauge wire, easily have a 5 or 6S lipo pack at their disposal, or be yanking their iron around by the power cord out in the field ;-)
TS100 Soldering Iron UnBoxing & Demonstration Video
TS100 Soldering Iron Direct Drive Cartridge Tip Technology - The Game Changer!
The thing that makes both the TS100 and TS80 soldering irons so amazing is the type of soldering tip technology used. I cover this in more detail on my RC soldering page, but here's a quick recap.
 The base TS100 soldering iron comes with the TS-I conical direct drive cartridge tip.
These "cartridge" type tips don't slide over a ceramic heating element like conventional soldering iron tips do. The heating element along with the temperature sensor are both integral within the tip.
Having the heater and sensor built right into the tip provides much better thermal efficiency, more accurate temperature reading and control, along with much faster response. As I also mentioned on the RC soldering page, this is why these cartridge technology tips of lower Wattage, can outperform traditional slide on tip iron that have more power. It really is amazing technology!
The other plus is cartridge type soldering iron tips are very easy and fairly safe to swap out while soldering. You certainly can't say the same for traditional slide on tips. Swapping soldering tips in the middle of a soldering job is something I rarely find myself doing, but for those that do, it's an important benefit.
The only drawback to cartridge tips is their cost. They do cost more than traditional slide on tips by about 3 to 4 times. The possible justification however is unlike a traditional slide on tip iron/station, if you burn the heating element out or the sensor takes a dump, unless you have a replacement and have the skill to replace it, you're dead in the water.
With the direct drive tip technology, if you burn out a heater or the sensor craps out in the tip, you just replace the tip.
As I mentioned in that video, after using the TS100 soldering iron with its direct drive/cartridge tips, I'm seriously considering replacing my traditional slide on tip soldering station with a new cartridge tip station.
As others have said, "once you use a direct drive cartridge tipped iron, you'll never want to use the older traditional slide on tip irons again." I now understand why.
The Hakko FX951 is the obvious choice, but even the FX951 is fairly costly for simple hobbyist and home shop use. That said, there are lots of "STM32 T12 Soldering Stations" on the market right now for very reasonable prices ($50 to $70 bucks). T12 (T15) by the way are the type of direct drive cartridge soldering tips the FX951 uses.
This KSGER T12 Soldering Station is the T12 station I chose. That link takes you to my full review of it.
The "Guts" Within
Direct drive cartridge style tips are all fine and good, but they require fairly fast PID control loop algorithms to get the most performance out of them.
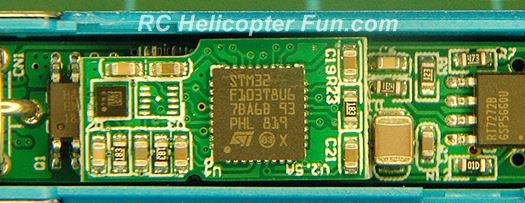
The TS100 soldering iron therefor has some fairly impressive guts inside to achieve this; primarily a 32-bit processor, the STM32 ARM Cortex F103T8U6 to be exact.
What would our RC hobby be without the STM32 ARM Cortex micro-controller? Our radios, our flight stabilization & flybarless systems, our ESCs & computerized LiPo chargers are filled with little STM32's these days. And now so are our soldering irons :-)
Using the TS100 Soldering Iron
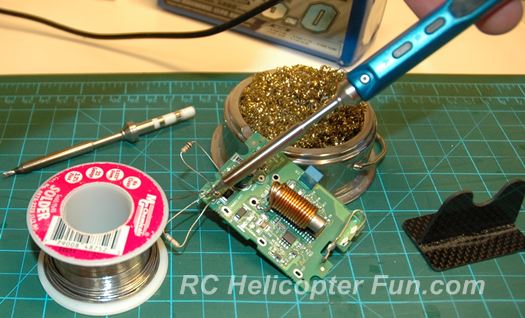 The TS100 Works Well On Small Circuit Boards Up To Large 8AWG RC Wiring & Connectors
Okay, I think by now you might be getting the vaguest hint I'm just a tad fond of soldering with this little iron ;-)
Heat up time is super fast at under 10 seconds when powered with 24V. That time pretty much triples when powering with 12V, but even then it's on par or better than traditional, old school slide on tip technology pro style soldering irons & stations.
I really like having the slightly shorter tip length and find I have better control and can keep the tip quite still under the microscope while working on small PCB's.
Despite reading reviews saying the top of the TS soldering tips where they butt up/into the iron, get overly hot so much so the plastic casing of the iron was getting soft, I've never experienced it. Warm yes, melting no! I rarely have the iron set much over 330C when working on circuit boards. Perhaps if I you have it maxed out at 400C for long duration, this is more of an issue?
The automatic standby and shut down feature is FANTASTIC! This is a completely new feature for me. Up till now, I've only used soldering irons that either didn't turn off, or ones that just have a time out feature and turn off after a set time limit.
The TS100 on the other hand has an accelerometer built into it, so it detects movement to know when it's being used or not. This is not only a great safety feature, but goes a long way to help you extend solder tip life as well as battery life if you are powering from a battery.
Let's look closer at all these cool settings...
TS100 Programmable Settings
The first parameter display shows the input voltage and the tip temperature.
Next is the working temperature that the iron automatically establishes when you first turn it on.
The default working temp is set to 300C (570F), but can be programmed from 100C to 400C (212F to 212F). You can change between Celsius and Fahrenheit (in another setting screen).
 Screen 3
You can set the sleep mode temperature the iron automatically changes to if it doesn't detect any movement in a programmed time frame.
This helps extend tip life & save battery power if you're powering from a battery.
The default standby temperature is 200C (390F), but can be programmed to any value between 100C to 400C (212F to 212F).
As soon as the accelerometer in the iron detects movement, the temperature changes back to the programmed working temperature.
 Screen 4
Sleep time is how long in seconds the iron will take to go into sleep mode after no movement is detected.
The default time is 180 seconds (3 minutes), but can be programmed to any value between 60-9999 seconds (1-166 minutes). As soon as you move the iron, the counter resets.
 Screen 5
Idle time is how long it takes for the iron to turn completely off after it goes into sleep mode.
If for example the you have the iron set with a 3 minute sleep time, and 6 minute idle time. If the iron is not moved at all, it will take 9 minutes to turn off (3 minutes to go into sleep, and 6 more to power down).
The default idle time is 360 seconds (6 minutes) with a programmable range from 300-9999 seconds (5-166 minutes).
Once the iron reaches the end of the set idle time, it turns completely off. As soon as you move it, it turns back on, but you have to press the A button to turn the tip heater back on. This is a nice added safety feature I have found.
 Screen 6
Temp step is how many degrees the iron tip temperature will increase or decrease incrementally when you are programming temperatures or manually setting your operation temperature.
The default step is 10 degrees with a programmable range from 5 to 25.
 Screen 7
Off volt is at what input voltage the TS100 soldering iron will go into standby mode if/when this low voltage threshold is reached.
The default is 10 volts with a range of 9V to 12V with a step resolution of 0.1V.
 Screen 8
Here's the screen where you can change between Celsius and Fahrenheit.

Last up is a neat little screen flip feature.
Default is right hand (sorry lefties), but if you use the iron in your left hand, change this value to "LH", and the display will flip so it reads correctly when in the left hand.
ESD Tip Grounding
The TS100 also has a small ground screw if you wish to earth ground the tip of the soldering iron while being used on static sensitive electronics. For average RC hobby, field, and household use, not a concern; but if you are working on ESD senstivive components, a nice feature.
I just made up a small eyelet to 4mm banana harness out of high-flex 24AWG silicone wire. The 4mm banana will plug into my bench top power supply ground or the ground in any standard electrical outlet.
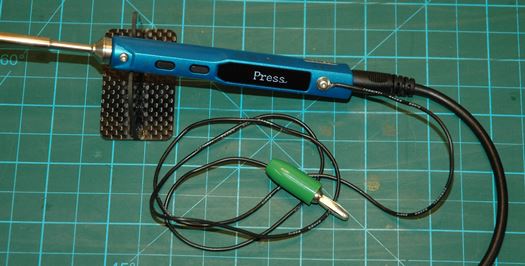 My TS100 Grounding Wire Using 24AWG Silicone Wire & 4mm Banana
TS100 Firmware Is Open Source
There is a micro USB port on the back of the TS100 soldering iron allowing you to not only update firmware, but use alternate firmware as well, and access the parameters.
I'm using my PC laptop in these photos, so have no idea how it works (if at all) with iOS. When you first plug the iron into your PC, it will automatically recognize the iron as a USB mass storage device and load the driver. The iron will display "CONFIG" on the display.
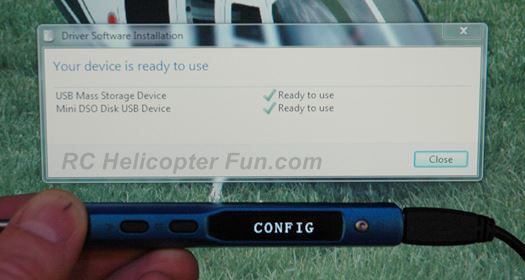 Hooking your TS100 up to your PC - CONFIG Mode
If you go into your drives, the TS100 shows as a removable storage device. If you click on it, the 1KB CONFIG text document shows. When you open this .txt file, it lists the parameters and what they are currently set to.
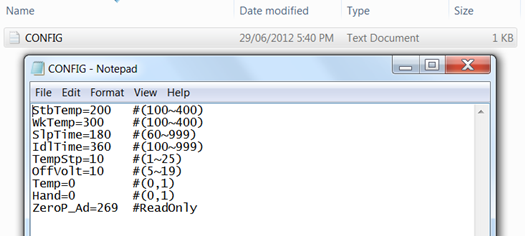 TS100 CONFIG File Opened
The latest TS100 firmware is available from www.miniware.com.cn site. You can change the boot up screen to any single color 96x16px BMP image file. I have not done this, but the instructions cover the process.
There is also a fellow by the name of Ben Brown who has written firmware for the TS100 called Ralem. It's got several really useful features RC'ers will like. You can download it here for free from github.
Of course you don't have to touch any of that stuff if you don't want to. These little irons work great out of the box for most people's needs. It's neat however you can take it beyond that if you like tinkering around with stuff.
TS100 Soldering Iron Powering Methods
As I already pointed out at the beginning of this article, the obvious way many RC'ers will be powering their TS100 irons is with a 3S to 6S LiPo pack. You can even get a nice soft silicone power cable with the 5525 barrel connector on one end and an XT-60 on the other if you don't want to make your own.
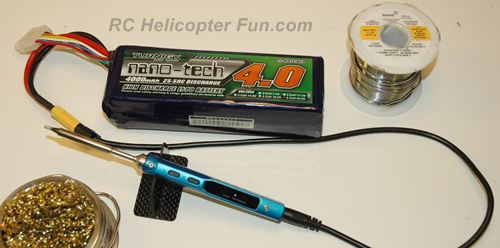 Powering my TS100 with a 6S LiPo Battery Pack @ storage voltage = 23.1V
I've been using 6S LiPo packs at their storage voltage (around 23.1V) which works great! A fully charged 6S lipo is putting out about 25V. That also seems to work fine, but it's over 24V.
To play it safe knowing Murphy's law and I are well acquainted and magic smoke shooting out of electronics is something I seem to be rather good at creating - I'll keep it below their 24V recommended highest voltage.
Of course 3S, 4S, and 5S LiPo packs work too, but the lower the voltage, the less Wattage you get and the longer the heat up/recovery time is.
Speaking of powering your TS100 by any 12V to 24V battery, we should look at some 12V to 24V "wall outlet" options since it's not always convenient or practical to be pulling out a LiPo battery pack every time you want to solder something at your work bench.
Again, this is where us electric RC'ers have it made because you likely already have several good 12-24VDC wall outlet power supplies and won't have to spend a dime to get something else.
First one that comes to mind is an RC power supply or supplies you use to power your RC battery charger/s. Most are going to be at least 12VDC and have more than enough power. The maximum the little TS100 can draw for example is up to 2.7 Amps (65W/24V).
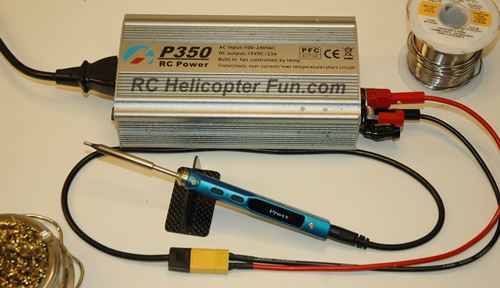 Powering my TS100 soldering iron from a typical RC charger 15V power supply.
Perhaps the best, most convenient, and least expensive wall outlet powering option for the TS100 soldering iron that almost all of us likely having lying around in a junk box is a standard laptop power supply/battery charger.
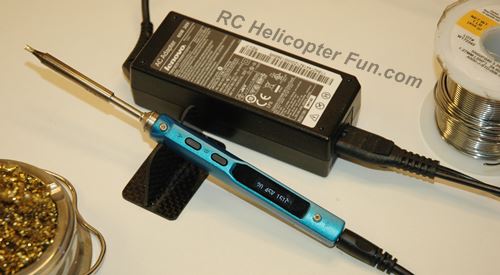 Powering my TS100 soldering iron with a 20V 3A Laptop power supply.
Laptop power supplies give really clean power. Most are outputting 19 to 20 volts (some even 24), they are rated around 3 to 5 Amps, putting out around 65 to 90 Watts, and are small in size. At 19 or 20 volts, you won't be able to get the full punch out of your TS100, but it will still do 10 gauge wire no problem.
Even if you don't have a spare laptop power supply, or can't steal one from your better half (I tried that first without much luck); they are inexpensive. Not only that, decent used ones are always being sold on eBay and computer repair shops for dirt cheap.
You'll likely have to put your own 5525 barrel connector on the end of a LapTop PS cable (or an XT60 if you get the XT60 TS100 cable); but I'm pretty sure if you are looking at this quality of iron, putting the correct plug on the end of a power supply wire is something you could do in your sleep.
TS100 Soldering Iron Fails
I really can't say much bad about the TS100 as objective as I'm trying to be; however, that doesn't mean there aren't a few little items I would like to see improved.
First up is the OLED display. It's wonderfully crisp and easy to see. Not only that, the display screen is actually glass which I didn't realize for a couple weeks. I figured it was plastic and would easily scratch like most other cheap plastic displays. Only while doing a proper clean after it was getting so dirty I couldn't stand looking at the fuzzy glow anymore, did I notice it was in fact a small glass display cover.
The down side is when using this mini soldering iron outside. In bright sun, it's very hard to see the display without cupping it with your hand. An annoyance, but nothing that prevents you from using it.
 Hard to see TS100 OLED display outside in the sun.
It feels really nice in the hands, almost like a pen, but the case can be slippery when your hands are cold or have some nitro oil on them. Having some sort of texture on the plastic would help perhaps?
It would be nice if you could choose the solder tip it ships with or a version without any tip so you can pair your own. Not everyone likes conical tips after all, and for RC use (many uses actually), the chisel/wedge TS-D24 is likely going to be your main goto tip.
As easy as it is to change tips on the TS100, the effectiveness or usefulness of the little 1.5mm hex screw that holds the tip is questionable. I don't even use it to be honest and just rely on the contacts within the iron to hold the tip in place which seems to be working out fine.
The available TS cartridge soldering tip selection is a little sparse. This might be limiting for more advanced electronic hobbyists, at least when compared to T12/T15 cartridge tip selection; but for most RC hobbyists and homer DIY'ers, not a problem. I would however like to see one more larger size of a wedge over the 2.4mm D24 one.
TS100 Soldering Tips
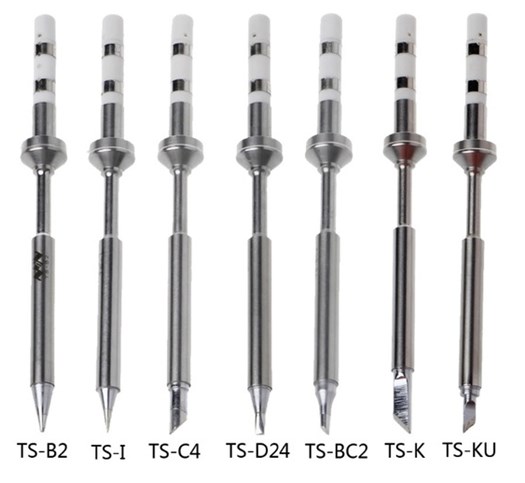
There are currently seven (7) tips available for the TS100. They all go by the tip designation "TS", followed by the tip shape code.
- TS-B2 is their larger conical tip.
- TS-I is their smaller conical tip (what the iron ships with).
- TS-C4 is their large bevel/hoof tip (likely the next tip I will get).
- TS-BC2 is their small bevel/hoof tip.
- TS-D24 is their chisel/wedge tip (my favorite most used).
- TS-K is their large knife edge tip.
- TS-KU is their small knife edge tip.
TS100 Soldering Iron Ordering Information
The TS100 soldering iron is sold at the usual online sources such as Amazon, Banggood, eBay, and Gearbest to name 4 popular ones many of us in the hobby use.
I have to admit, here in Canada, Banggood is getting pretty hard to beat when it comes to both pricing and shipping speed. It's where I ordered my Sapphire TS100 from and it arrived here in less than two weeks while being the least expensive.
Here are a few links from Amazon & Bangood so you can compare pricing and different packages for the best deal to suit your specific needs.
Amazon TS100 deals:
Firmware:
