RC Soldering For Beginners,
Tools & Tips
by John Salt - Last updated November 2023
Tool and "how to" questions related to RC soldering are some of the most common I get. Everything from what equipment I use and recommend, to purchasing advice for beginners on a budget.
Soldering specifics such as why is Wattage important, what temperature to use, what type of tip technology is best, tip shapes, type of solder to use, importance of flux, etc. are also common.
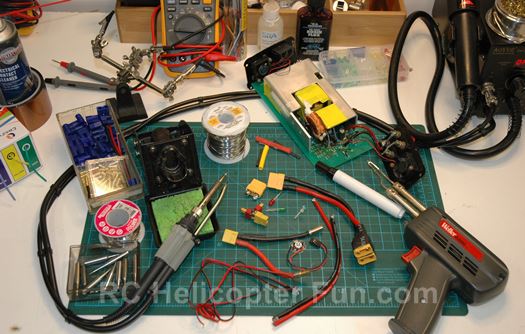
If you have such questions, I hope this page will help you gain the knowledge and confidence to give soldering a try; and most importantly, have fun while soldering and become proficient at it.
We'll start with the more basic RC soldering questions first, but if you wish to jump down the page right to the actual RC soldering equipment recommendations - click here.
Why is soldering necessary in our RC hobby?
Soldering is truly one of the most important skills we can learn in this wonderful and fascinating hobby; especially since the introduction of electric powered RC models.
Being able to solder your RC connectors to your LiPo packs, ESCs/motors, splice wire, solder wire to the ground plane or power bus pads on certain quad-copter builds... It's all is essential stuff and unless you only get ready to fly or drive models that don't last long enough to wear out electric consumables or need electrical repairs; you'll sooner rather than later be faced with at least one of the above tasks.
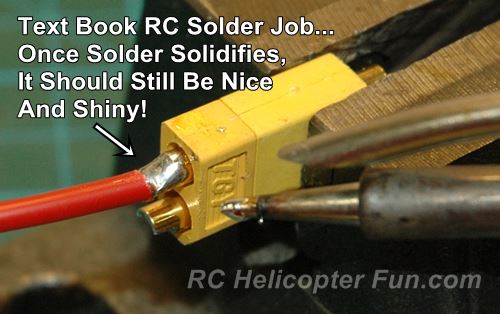 Text Book RC Soldering Job On XT-60 Connector
Building your own lighting systems, making your own series or parallel LiPo wiring harnesses and making component level circuit board repairs are other common useful RC soldering projects. Even if it's as simple as re-soldering a broken wire to a servo, or antenna lead to the PCB (printed circuit board).
Soldering goes beyond electrical joinery applications in the world of RC; it's also a very useful way to firmly bond parts such as brass and copper clevises to steel pushrods or other small metal to metal joinery RC projects.
I can't imagine how frustrating, or at least how limiting this hobby would be without RC soldering skills at the ready. Not to mention costly if you always have to pay someone else to do it.
Low Temperature Soft Soldering?
The type of soldering we are going to be learning about on this page is classified as "soft soldering".
This is the most common, easiest, and requires the least expensive equipment and consumables of all soldering types. My dad taught me to soft solder when I was only eight! If an eight year old can learn it, anyone can.
Soft soldering is considered a low heat solder method, utilizing tin solder alloys with relatively low melting temperatures. Temperatures somewhere between 200C to 400C (400F to 750F) are the typical ranges you'll be working with while "soft soldering".
Different solder types, melt at different temps, but as a very generalized rule, tin leaded solders melt around 185C (365F), and tin unleaded solders melt around 230C (450F).
Common metals in our hobby that can be easily soft soldered include copper, tin, brass, gold, soft steel, iron, and bronze. Common metals in our hobby that can't be soft soldered included aluminum, stainless steel and titanium.
Soldering doesn't melt the actual metal parts you are joining like welding does. The molten tin alloy instead forms a metallurgical bond by reacting with the other metal surfaces. This provides both strong mechanical and electrical bonding, but is only as strong as the tin based alloy solder is. Since tin based solders are quite soft, the bond is not as strong as a brazed or welded metal joint.
Is RC soldering dangerous?
Danger is one of the common excuses I get from people who never learned to solder; simply because they thought it was too dangerous, much like welding is.
This is not the case at all. Soft soldering is not nearly as dangerous as welding or even brazing for that matter; where temperatures are much higher (order of magnitude and more).
There is also no bright or UV light output from soft soldering, flying sparks or welding slag, so no special clothing or eye protection is required over that of standard safety glasses or just eye glasses.
Minor burns are possible.
If (more likely when), you accidentally touch the tip of your soldering iron to your skin, the worse that happens is you get a tiny spot burn that may blister. Same goes if you drop a blob of molten solder onto your skin. This hurts more and usually ends up causing a deeper burn because you can't remove it as quickly as a light brush of the tip of your soldering iron, but it's still minor on the burn severity scale.
I've had a few flaming marshmallows melt/drip onto my hands over the years and that did way more damage than the worst soldering burns I've ever experienced. In my case, roasting marshmallows over the campfire is definitely more dangerous than soldering :-)
The fumes produced from soldering are also much less toxic than those produced while welding or brazing, and don't stink nearly as bad as burning marshmallows.
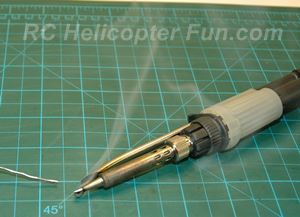 Flux Smoking On Soldering Iron Tip
Most of the fumes and smoke you see while soldering are from the flux boiling off.
Cancer risks from solder fumes are reportedly very low since the boiling point for solder is several times hotter than the melting temperature.
Boiling a metal is when all the bad stuff starts off-gassing, but we are never getting that hot.
There can certainly be minor traces of metal fuming as well if you solder at higher temperatures, but it's very low in concentration. Unless you are doing this for a living 8 hours a day, 5 days a week; nothing that should be too disconcerting.
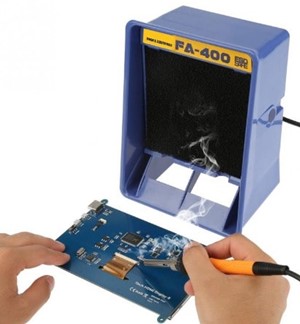
If you are concerned with the fumes produced, there are soldering smoke/fume extractors such as the Hakko FA-400 pictured here.
Lead that is used in the solder is pretty much your biggest health concern, but it comes from touching the lead, not breathing the fumes.
The levels are low and unless you are sticking your solder spool or projects in your mouth or not washing your hands after handling it, you don't have much to worry about.
That said, there are no 100% safe levels of lead.
There are lead free solders of course, but for our applications and hobby work, I don't recommend them!
No-lead solder is much harder for hobbyists to work with, especially beginners. It has a much narrower working temperature range, and is very prone to cold and brittle joints without lots of practice and really good temperature controlled soldering equipment.
Stability of the components as unleaded solder cools and solidifies is also extremely critical, and something that the average RC hobbyist is not able to achieve; at least consistently without months/years of practice. As lead free solders improve, these "usability" issues will no doubt subside and hopefully unleaded solder will become as beginner/RC hobbyist friendly and robust as leaded solder is - it's not there yet however.
RC Soldering Video Tutorials
I have several soldering "how to video's" on my RC Connectors Page which goes over basic connector & wire soldering. Here are direct links to them:
- Soldering EC3 Connector With Soldering Iron
- Soldering XT90 Connector With Soldering Gun
- Soldering Dean's Connectors With Soldering Iron
- Soldering Bullet Pins With TS100 Soldering Iron
- How To Tin High Flex Silicone Wire
- How To Splice Wire
RC Soldering Equipment
Now that we have gone over the basics of RC soldering, let's get to the actual equipment you will need since these are by far the most common type questions I get asked - such as:
- How much will this RC soldering equipment cost?
- Power output & temperature?
- Soldering gun, vs. iron, vs. soldering station?
- Tip technology (cartridge vs. slide on)?
- Tip shapes?
- Cleaning tips? Sponge vs. brass shavings?
- RC Soldering Equipment recommendations based on budget?
All good questions! So let's take them one at a time.
Cost:
First off, you don't need to spend a fortune on RC soldering equipment to get good results. Moreover, you can find really good soldering equipment these days that rivals and even surpasses the performance of some of the more traditional, older technology, expensive big name stuff.
A temperature adjustable, $40 to $50 USD soldering iron of a moderate wattage (about 70W or so), with the correct style tip/s along with good quality solder & flux can give very good results for wire size up to about 12 AWG.
Any larger than 12 AWG, and an inexpensive 140 Watt soldering gun performs well (again in the $40 to $50 USD price range).
By the way, if you are not sure what AWG is, it stands for American Wire Gauge, and is the standard by how all wiring is sized (the larger the AWG number, the smaller the wire).
If you look at the wires on your RC model, LiPo packs, or ESC, you should be able to find the AWG number printed on the wire to give you an idea of the size of wiring you'll likely be soldering as shown in the photo below.
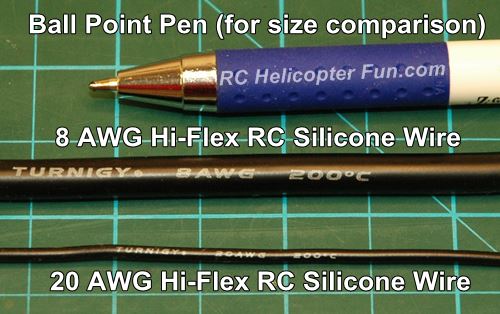 RC Wire Size Comparison 20 AWG vs 8 AWG
For electric powered RC applications, this size range will be from around 20 AWG up to 8 AWG.
What RC soldering equipment you end up getting depends both on your budget and what you'll be soldering. If for example all you ever need to solder are RC connectors, then a fixed temperature, 75W to 100W soldering iron or soldering gun will get the job done. Not having accurate temperature control on such devises however is limiting and can be damaging on temperature sensitive components.
You'll need temperature control if you wish to correctly and safely solder a range of items; from larger wire and connectors down to small SMD component level repairs. For that range of work, a versatile temperature controlled soldering station with multiple tip options is pretty much a must.
Wattage & Temperature:
Wattage is the most important value to consider when looking at a soldering gun or iron. Don't confuse Wattage with temperature.
A 100W soldering iron for example that is set at 500F can solder a much larger wire than a 25W iron set at 750F. The larger the component you are soldering, the more heat it will pull out of the soldering iron or gun, and you therefore need more Watts of power to keep generating enough heat at the tip to keep the solder flowing.
I don't want to get overly deep into soldering temperatures because everyone has their own preference of what temperature/s they like to solder at best.
Higher temps flow better, but it's harder on components, and the flux evaporates faster and as a result, gives less working time before the solder starts oxidizing.
Personally when using traditional slide on soldering tips, I like setting the temperature on the higher side around 370C (700F) (using 60/40 leaded solder). When using cartridge tip irons, I'll dial it down a little bit to around 350C (660F) for the simple reason slide on tips tend to run at a lower temperature than what the iron temperature is set at since they don't respond as fast.
Anyway, back to the Wattage...
Here's a very generalized list showing Wattage rating of traditional slide on tip soldering irons needed to produce enough sustained heat to properly solder wire of various sizes fairly quickly.
- 30W up to 16 AWG
- 50W up to 14 AWG
- 75W up to 12 AWG
- 100W 10-12 AWG
- 150W 6 - 10 AWG
As I said, this list is a generalization because variables such as tip technology, thermal efficiency, tip shape, tip thermal mass, how long you are willing to pump heat into the wire, your own soldering skill and technique, all affect how much heat is delivered to and out the tip. Solder tips and tip technology will be covered shortly.
Note, you can certainly solder smaller wire with higher power irons/guns, but you can't solder larger wire without enough power.
If you go too low, at best the solder won't flow well to penetrate the joint properly resulting in a cold solder joint and poor mechanical and electrical connection. At worst, you won't even be able to get the solder to melt because the larger wire or component is pulling the heat away faster then the iron can produce it.
The three biggest issues I see with less than ideal beginner soldering jobs are due to:
- Using too small a Wattage iron for the application.
- Using crappy quality / incorrect type solder.
- Having dirty oxidized solder tips / not using enough flux.
If you get a slide on tip iron around 70W, you'll be covered for most RC soldering jobs up to 12 AWG wire. If you get a cartridge tip technology iron, you'll be covered for pretty much anything the hobby can toss your way. The solder & flux issue will be taken care of with good quality rosin core solder with extra flux at the ready if needed.
Soldering Gun vs. Soldering Iron:
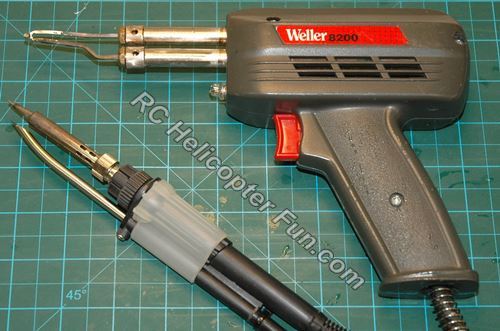
If you are older, you likely grew up with, or have at least seen the good old Weller 8200 soldering gun (now replaced with the 9400). If all you'll be doing is larger RC connectors and larger wiring projects, nothing for the price in my opinion beats a tried and true Weller soldering gun. I can easily solder large 6 AWG wire with mine.
Soldering guns generally give a combination of the most power per dollar coupled with fast heat up time - around 5 seconds! They are for the most part very convenient and easy to use.
Soldering guns however are no good for PCB work. They are bulky to handle, can't do small/fine detailed soldering, and can easily damage the board and the components due to the high heat and power they output. Not only that, gun tips do wear out rather fast. I get on average 6 months out of a tip on my two Weller 8200's; usage dependent of course. I've gone through tips in as little as a week when using the guns daily! Good soldering iron tips on the other hand can last for years when properly cared for.
Which brings us to the irons and solder stations.
If you've only used cheap soldering irons in the past, you're in for a real treat here! I'm referring to those bulky irons you plugged into the wall outlet with a stiff cord, had no temperature control, were not that nice to hold or manipulate, and took several minutes to heat up and stabilize before you could start using them - YUK!
Don't worry folks, we won't be using that antiquated garbage anymore.
Small and comfortable, temperature adjustable, powerful with fast response, microprocessor controlled soldering irons and stations are now an affordable reality for hobbyists - even for the most modest of budgets.
The good pro style ones with replaceable tips that slide over a ceramic core with temp sensor will heat up in about 30 seconds and have decent response time and temp control. That said, it's 30 year old technology.
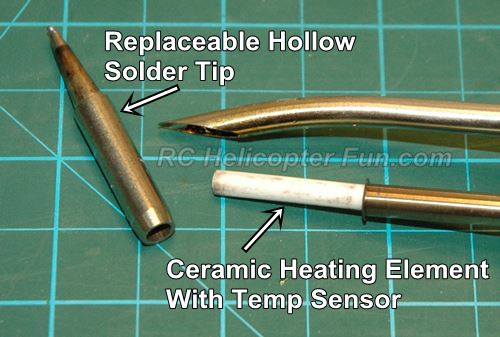 Traditional Slide On 900M Solder Tip Components
Cartridge tip technology vs. slide on tips:
We have something even better available now, and that's cartridge tip technology, also called integrated tip technology, direct drive technology, & smart tip technology.
Instead of using replaceable tips that are hollowed out in the middle and slide over a ceramic rod that contains the heating element and temperature probe (popular examples are T18 or 900M tips); these new style "integrated tips" have the heating element and temperature sensing built right into the "cartridge style" tip.
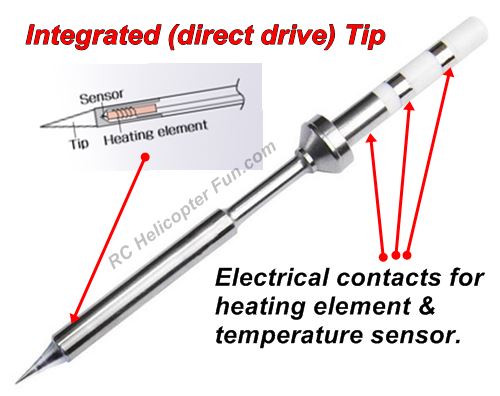
This integration provides many advantages including better thermal conductivity/efficiency, along with much faster and more accurate tip temperature feedback and control. Tip temperature fluctuations are very small compared to traditional style tips and because there is little heat transfer loss, they perform like a higher Wattage soldering iron.
A 65W integrated tip technology iron for example can hold its own next to a traditional 100W slide on tip iron and do so at a lower temperature setting no less. Running lower temperatures also helps extend tip life and the tip plating. Lastly, cartridge style tips are easier to replace "on the fly" while working with the iron.
There is certainly nothing wrong the the older technology slide on tips - especially for hobbyists. Pros have been using them for years and slide on tips are also less expensive, standardized, and readily available.
I do however want to point out the better cartridge tip technology, especially since prices have plummeted over the past several years, and they offer such superior performance.
A must if you wish to use unleaded solder in my opinion; and once you use a cartridge tip technology iron, chances are you won't ever want to use a more traditional slide on tip iron. I'll show you two good options that are around $50 in my recommendations shortly.
For us RC helicopter pilots, think of traditional solder tip technology being a flybar and the cartridge tip technology as flybarless. That should give you a pretty good analogy of the improvement :-)
Soldering Iron Tip Shape:
Regardless of tip technology, there are 4 basic soldering iron tip shapes:
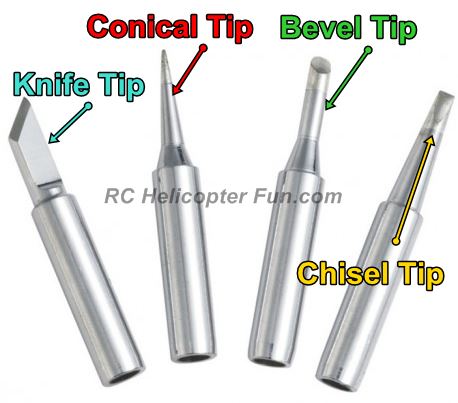 4 Basic 900M Tip Shapes
- Knife (K series)
- Conical (B series)
- Bevel/Hoof (BC series)
- Chisel/Wedge (D series)
There are certainly others, but these are the most common "hobby variety" we will come across. There are obviously different sizes (how thick or thin the tip is) within those 4 basic ones. Tips are generally sized by the width in millimeters. A D24 chisel tip for example is 2.4mm wide at the tip.
Knife and bevel tips are pretty much used exclusively for PCB work. For the majority of RC soldering projects, I personally use conical and chisel tips 95% of the time.
Many pros hate conical tips, but I still find them a good universal overall tip for pin-point applications and a good one for beginners. Conical tips work well for PCB work, components, and smaller wiring. Their main drawback is they are not that thermally efficient since they taper down to a point so you generally have to set the iron temp a little higher when using them, and then the heat is quickly pulled out of the tip when you touch it to the component.
For RC connector and wire soldering, a good "thermally efficient" chisel tip is hard to beat. So no matter what soldering iron you choose, I would recommend at minimum a standard conical tip, and a standard chisel tip to start with. As you gain soldering experience, you'll figure out which tips you personally like using best for different applications.
The size of the tip end will dictate thermal mass and contact area between the tip and the component. A larger tip end will therefore have more thermal mass and transfer more heat to whatever you're soldering.
Cleaning Your RC Soldering Tips:
Keeping your soldering tips clean is one of the most important things you can do while soldering. Clean tips will last much longer. The flux that gets on them can be mildly corrosive (when heated) and slowly eat away at the tip.
A clean solder tip will also "wet" (coat) better, which transfers heat better and helps keep burnt flux residue and oxidized solder out of your soldering joint.
 Dirty Tip On Left, Cleaned Tip On Right
There are two main ways to clean tips, both which are done while the tip is at operating temperature:
- Damp sponge
- Brass shavings
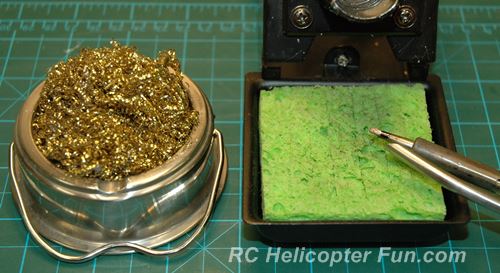 Brass Shavings On Left, Damp Sponge On Right
I use both methods depending on when I clean the tip. While working and actively soldering, brass shavings work the best I find. They don't pull a bunch of heat from the soldering tip like the damp sponge will.
For final cleaning however before (or immediately after) I turn the iron/solder station off, passing the tip through the wet sponge several times does a really good job of cleaning. The tip is spotless afterward with no flux residue remaining.
It won't hurt to coat the solder tip with a layer of solder at this time to protect the iron plating from oxidation before powering off the iron. After cleaning the tip, it certainly will still have a thin layer of protective solder on it; but adding a little more solder to the tip will protect the iron plating layer a little better. Your call if you want to coat the tip in extra solder before turning it off.
NEVER file or sand a soldering tip to clean it, or reshape it.
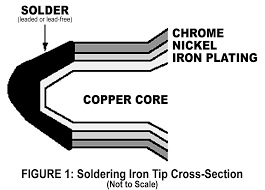
If you do, you have just removed the protective iron plating layer, exposing the copper core of the tip.
The exposed copper will quickly degrade (it actually dissolves) when exposed to the molten tin in the solder.
This is the primary reason soldering gun tips don't last long. They don't have that same level (if any) iron plating protection to protect the copper underneath.
For those that want a deep understanding of soldering tip design, use, and care; I highly recommend reading "Extending Soldering Iron Tip Life".
RC Soldering Equipment Recommendations
Now that you are well versed in soldering, time to get to the fun stuff - choosing and purchasing soldering equipment that will do the job and is within your budget.
A really good safety feature you should consider with any soldering station is that it automatically turns the iron off when you are not using it; or at least puts it in some sort of standby mode where the temperature is ramped down to extend the life of the tip. Every iron I have listed below has either feature. The soldering gun does not because it always turns off when you are not holding the trigger down.
I'm listing them in order of price (lowest to highest) with some thoughts about each unit. Ones that use cartridge tip technology I'll point out with CTT.
We'll look at solder & flux afterward since they're almost as important as the hot working end ;-)
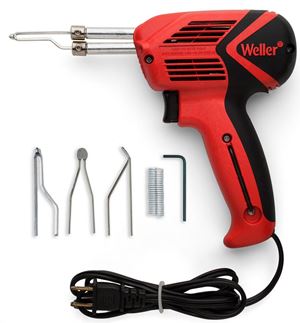
Weller 9400 Soldering Gun ($40.00 USD)
If all you'll ever do is large wiring and large soldering projects, as I already mentioned, nothing in my opinion beats a convenient and easy to use soldering gun.
The Weller 9400 (replaces the legendary 8200) heats up very fast (about 5 seconds when the trigger is pressed).
This two position trigger allows you to select either 100 Watt or 140 Watt output giving you some rudimentary level of heat control.
These Weller guns are robust and a time proven soldering tool. They are what little eight year old Johnny learned on, and what he still most often reaches for when big wires are looming.
- Weller 9400 Soldering Gun
- Weller Soldering Gun Replacement Tips (recommended since they wear out rather quickly)
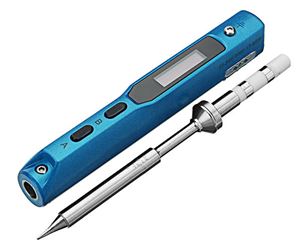
TS100 Digital Soldering Iron (CTT) ($50.00 USD)
What more can anyone say about the TS100 (now the updated TS101) digital soldering iron?
This is by far, one of the best soldering irons on the market right now in this low price range, and even more so for us electric RC'ers.
The TS100/TS101 is small yet powerful at 65 Watts. Heat up time is around 8 seconds at 24VDC. 32-bit ARM processor (SMT32) gives us many advanced control options and safety features such as lockout and standby.
It performs as well (better in fact) as more traditional professional irons rated at 100W. Reason being, it uses the newer cartridge integrated / direct drive tip technology once only available on higher end soldering station irons such as the Hakko FX951 ($250 USD), or the $600.00 JBC QC series.
The TS100/101 is very portable and is powered from a 12 to 24VDC power source (no you can't just plug it into the wall outlet). For us electric RC'ers, that means we can conveniently power it with a 3S up to 6S LiPo, or 12 to 24VDC RC power supply that we use for our computerized chargers.
The TS100 / TS101 will do the smallest component level SMD rework/repair, right up to 10 AWG wire. 8 AWG is even possible with good solder and good technique, which I demonstrate in the video below. If I was just getting into the hobby and didn't want to spend too much on a soldering iron, this is the one I would toss my money down on without hesitation since it's not only affordable and powerful, it's very portable.
Having a good quality iron to take out to the field, or just around the house and yard to do proper solder repairs is something I've longed dreamed about. I used to take one of those crappy and dangerous butane soldering irons along with me - pure antiquated junk in comparison.
The TS100 doesn't use the same T12/T15 tips the Hakko uses, but rather a shorter integrated tip known as TS MINI Tips. It comes standard with a conical TS-I tip; so for RC use, I would also recommend getting their TS-D24 chisel tip. The one drawback is TS tips are about twice as much as the more common Hakko type T12/T15 tips.
This is also not the soldering iron for you if you don't have a way to power it (the next one in the list is); but again, for most of us electric RC'ers, that's not going to be an issue. It's almost like they specifically had us in mind when they designed it :-)
Banggood:
Amazon:
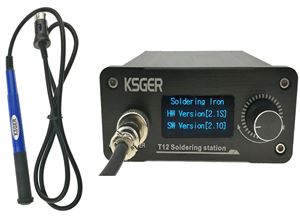
KSGER V2.1S T-12 Solder Station (CTT) ($60.00 USD)
This is another amazing modern soldering tool given the low price and integrated tip technology performance.
Here's my full in-depth review.
These are considered "Hakko Clones" and therefore use the same T12 / T15 cartridge style tips that Hakko use in their FX951 solder station.
The KSGER V2.1S solder station rated at 70 Watts is a powerful little animal and comes in several flavors so you kinda have to know what you are looking for. You will also see them sold under the names "Quicko", "ShineNow", and likely more I haven't run across.
Regardless, all are marketed as "T12 solder stations", have the same nice OLED display, easy to scroll single push button turn knob, and are controlled by a 32-bit ARM processor (the STM32 micro controller to be exact).
The KSGER's come in both kit form for enthusiastic hobbyists, or fully built ready to plug in and use. KSGER really have too many options (not all good either), but if you get the right version - wow! Amazing performance & value with easy dial control user interface.
The primary difference between versions is the powering method and iron it comes with. You can get the display only and power it from your own 12 to 24VDC power supply, or get several versions with a built in power supply good for 110VAC to 240VAC for all markets.
They are available online from the usual China direct outlets, but Banggood usually has the best pricing, selection, and the one with the good isolated switch mode power supply.
This specific V2.1S package is geared toward PCB hobbyists, not RC, and as such comes with a T12-K knife tip for PCB re-flow work over a chisel tip which is better suited for RC / wiring projects.
I would therefore also recommend picking up at minimum a T12/T15-D24 tip. You can also get multi T12 or T15 (same thing) tip sets for both Hakko and KSGER so do a little searching for the right combination of tips you feel are best suited for your particular application.
Here's my video review:
Hakko FX888D Solder Station ($100.00 USD)
Hakko make very good (many say the best) soldering stations for the dollar.
They are tough, robust, and a favorite brand for true electronics hobbyists.
You pay a bit more for that higher quality, but less than what a similar pro-quality Weller solder station will set you back.
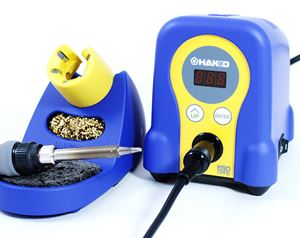
The $100 dollar 70 Watt FX888D is their most popular "hobbyist" unit. It uses the more traditional slide on T18 tip technology if you would rather use the older, tried and true slide on tips that are easier to find and less costly to replace.
Hakko irons are so nice to hold and move around. They are balanced nicely and just the right size. If you do lots of soldering and want a solid and reliable station, the FX888D is a popular workhorse in the industry.
Hakko FX951 Solder Station (CTT) ($250.00 USD)
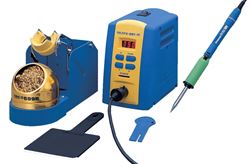
For the serious electronic and RC soldering enthusiast, the 65 Watt Hakko FX951 is one of the best soldering stations around right now.
If you want all the benefits and performance that cartridge tip technology gives us, but can't bring yourself to purchasing one of the less expensive T12 stations, the real deal is for you!
It's overkill in my opinion for what the average RC hobbyist needs, but for true RC & electronics enthusiasts and professionals, the Hakko FX951 offers that top quality for a fair price. It is after all still less than half the cost of the JBC QC series solder stations.
Solder & Flux
If you're going to be soldering, you need good quality solder & flux.
You can have the best soldering equipment going along with years of soldering experience; but use cheap, crappy solder and you'll get poor results every time.
I have made some very respectable emergency field solder repairs with good quality solder and a BIC lighter that are better than some of the solder jobs I have made with a high quality soldering iron and crappy solder.
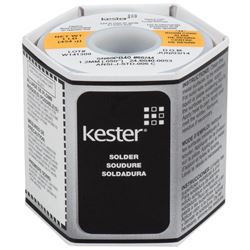
That is how important solder quality is. In my 40+ years of soldering experience (both as a hobbyist & professionally as a technician), I've used many different types & brands of solder, but keep coming back to good old Kester 44 Rosin Core 60/40.
Note, these are leaded solders (60% tin, 40% lead).
As I already mentioned earlier on this page, it's very hard to get good manual soldering results with unleaded. Incorrect temperature, along with any movement whatsoever as the parts are cooling, and you will get a cold/brittle solder joint - guaranteed! It can happen with 40% leaded solder as well, but 40% leaded solder is much more forgiving to both movement, and has a much broader working temperature range.
Stick with a quality 40% leaded solder that contains a rosin core (flux built in), wash your hands after soldering, and your RC electrical connections will be solid for years.
What about 37% Leaded Solders?
You will also run across 63/37 tin/lead solder ratios. Some like working with 63/37 better than 60/40 because the 63/37 has a slightly lower melting point (a few degrees only); but more importantly, transitions from liquid state to solid much quicker. This time frame where the solder transitions from liquid to solid is know as the "eutectic point", or more commonly, the "plastic phase".
The advantage with a shorter or next to non-existent plastic phase is you don't have to hold the solder joint/connection nice and still for as long. The solder changes from liquid to solid very fast. The shorter this transition time, the less likely any accidental movement introduced would contribute to a cold, brittle, or weak solder joint. Some folks insist this makes 63/37 easier for beginners to work with.
To be honest, I've used both ratios throughout the years and haven't found any appreciable difference; but I admit, I still like working with 60/40 better.
The shorter plastic time frame with 63/37 is at times irrelevant because it's application dependent. For example, when soldering larger items with more thermal mass (big wires and connectors), the time it takes for the solder to change states can be just as long with a 63/37 as it is with a 60/40. I also like the thought that 60/40 may just provided a little more vibration immunity to a less than perfect solder job because it is a wee bit softer.
Regardless, I would happily use either; and compared to unleaded solder, both 60/40 and 63/37 are superior to work with.
If you have the chance, I encourage you to eventually try both 60/40 and 63/37 to see if you find either better suited to your soldering applications and personal technique. That said, get the same exact brand when making these comparisons (example Kester 44 in both 60/40 and 63/37).
It's impossible to know if one ratio is clearly better when comparing different brands. It might be the brand's rosin/flux or rosin/flux percentage you find working with better than the actual percentage of tin and lead for example.
Flux:
So what is all this "flux" stuff? It's super important while soldering. You can't solder without it. Its primary job is to clean oxidation off the surfaces of what you are soldering so the solder can easily form that metallurgical bond. It also then prevents the surfaces and liquid solder from oxidizing as you are applying it (hot metals readily oxidize after all).
The flux is coating everything keeping the oxygen away from the molten solder and surfaces you are bonding.
Oxidized solder basically gets this "sticky skin" on it that prevents it from flowing well - this happens quite fast too! You will notice the color of the solder puddle turning a flat grey instead of staying a shiny, mercury looking silver if you don't have enough flux or it boils off before you are finished soldering.
This sticky skin often also sticks to your soldering tip and as you pull it away, you might get a sharp oxidation skin whisker that can cause shorts.
Another tell tale sign of solder oxidation is the solder turns dull grey after it cools and solidifies. A good solder job with no oxidation should still be fairly silvery and shiny after it cools.
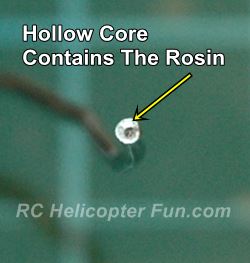 Kester #66 core size signifies it uses 3.3% rosin. This is a nice all round percentage to work with.
Solders with rosin cores have a center core that contains rosin flux (refined pine sap).
If you use good quality rosin core solders like Kester or MG Chemicals, you have good technique, and are not soldering at overly high temperatures, you really shouldn't need to add extra flux too often; but every now and then, you will have to.
You may for example end up working too long on the RC soldering connection, and boil the rosin off, or working at too high a temperature and boil it off faster then it takes to get the job done.
This just takes practice and experience, but the moment you start seeing that "skin" form on the solder puddle, it no longer resembles mercury, or you notice the solder is not flowing and moving around as well as it should - more flux or more solder with the rosin core will need to be added to get that protective flux layer back.
Most certainly if you are doing re-flow rework or SMD component level repairs on PCB's, you will need to apply flux right off the bat.
Rosin core solder aside, electrical soldering flux comes in several flavors. The most common you will run across are:
Each have their pros and cons for specific applications. You will find, the thinner the flux, the faster is boils/flashes off so the working time is shorter. The plus is it leaves less residue. Non rosin based pastes are a good compromise of not flashing off too fast, and not leaving too much remaining residue. At least that has been my experience over the years.
Size of Solder:
Last 'little' item to mention here is size. Solders come in different size diameters. They also come in different weight rolls or spools which determines how much length you get, but what I'm talking about here is the actual diameter of the solder.
Larger diameter solder is better suited to larger wiring and soldering projects while thinner diameter solder is better for small jobs like circuit board work. As you gain experience, you'll find what size/s you like working with best for various jobs. I'm just giving you a few suggestions here if you really have no idea what size is best suited for what.
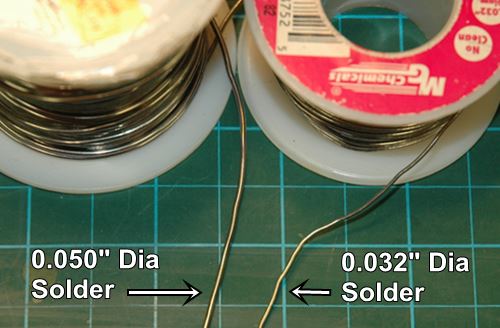
I personally like using 0.050" diameter solder best for RC connectors and most wiring jobs. For smaller through-hole circuit board work 0.030" or so and for SMD (surface mount device) circuit board work, 0.020" is very workable I find.
If you want a fairly "universal" size, 0.040" works well but it is too large for small SMD work.
You can of course always use smaller diameter solders for larger jobs, you'll just have to feed more length of it into the joint. This is more costly over just getting a larger diameter solder so you don't have to use as much.
Solder is generally priced by weight, not spool length; so a 1 lb roll of 0.050" and a 1 lb roll of 0.030" solder will give you more or less the same amount of solder material, it's just more efficient and much easier to work with if you use the right diameter for your specific RC soldering task.
- Kester 44 60/40 Rosin Core 0.05" (1 lb size spool)
- MG Chemicals 60/40 Rosin Core 0.05" (0.5 lb size spool)
How to pronounce "Solder"?
Just having a little fun here to trigger a few pronunciation trolls.
Yes, believe it or not, solder pronunciation in the English language has become a time wasting topic of debate. Do you pronounce the "L" as you would in solid, or leave it silent like you would in salmon?
Both are perfectly acceptable. Don't let the social media trolls tell you otherwise as most never take the time to look up the etymology of the word.
"Solder", in English is a re-Latinization from the 15th Century. The Latin origin is the word solidaire, meaning to “to make solid.”
However, the modern day Anglo-French Solder word comes from soudure "to weld." The loss of the Latin "L" on the way to Old French is regular, as poudre from pulverem, cou from collum, chaud from calidus.
Fowler, an English scholar wrote that solder without the "L" was "The only pronunciation I have ever heard, except from the half-educated to whom spelling is a final court of appeal ..."
Here in Canada and USA, leaving the "L" silent (Anglo-French) is what's predominantly used in both education & industry; but say it however you wish.
As anyone who works, or has worked in a tech or electrical industry can attest; being able to correctly solder is on orders of magnitude more important and critical than how it's pronounced.
Happy RC sodd-er-ing ;-)
