RC Helicopter Training
Nose Direction Forward Flight
by John Salt
Welcome To Training Day 6...
Today’s RC helicopter training lesson will introduce you to flying your helicopter with the nose pointed in the direction of travel.
As you know, up to this point you have been always flying with the nose pointed forward into the wind or "tail in". This was not only to make the helicopter a little easier to fly; it was to make sure you didn’t get disorientated.
Disorientation is the biggest cause of crashes for most learners and pros alike. While your helicopter was always pointed forward away from you, it was very hard to get disorientated because it's just like sitting inside the helicopter.
If you want the helicopter to move to the right you moved the cyclic to the right, if you wanted to move forward and away from you – the cyclic is moved forward.
Now we are going to start changing the orientation of the helicopter. After all, it would look pretty silly if you only could fly with the helicopter always flying tail in, it would also limit how fast you could fly. We have to get the nose pointing in the direction of flight, and in order to do that you will be seeing the helicopter from many different orientations.
I should point out that day 6 RC helicopter training is when some people start crashing. Not because they can’t fly, but because they get confused which way the helicopter is pointed and simply make the wrong control input and the helicopter gets away from them and crashes. If you take it slow today, you will minimize the chance of this happening and have no problem bringing your heli home in one piece.
I won’t go into all the pre flight checks today - they should be automatic by now – if not, review days 3,4, or 5. A nice soft grass field is the best choice for today and RC helicopter training gear is still a must.
RC Helicopter Training Nose Direction Video
As with every other RC helicopter training day so far, start with your helicopter over the reference point with the nose pointing forward into the wind and you standing about 10-15 feet behind the bird.
Slowly increase your throttle/collective and get into a nice hover about 2-3 feet high and hold it over your reference spot to get comfortable.
First start out by moving your helicopter to the right about 15-20 feet from the reference mark and then all the way back not stopping at the reference mark, but continuing to the left side of it about 15-20 feet.
Do this a few times until you feel comfortable seeing it move back and forth in front of you and out to each side still keeping the nose pointing forward and moving slow and in control.
Now it is time to get the nose pointing in the direction of flight.
Perform the same exercise moving the helicopter sideways to the right about 15-20 feet and then bring it back, but this time as you are flying back to the left, give a little bit of left tail rotor to turn the nose left into the direction of flight.
When you are first starting this, to keep from getting disorientated don’t turn the nose to the left until the helicopter is passing in front of you. That way if you get disorientated, you can just pivot your body to the left so you are looking at the helicopter from the back in the way you are use to.
Once your RC helicopter passed by you and is 15-20 feet to the left of the reference point, get back into a solid hover with the nose pointing into the wind. Start coming back to the right and as the helicopter passed in front of you, give a right tail rotor command to turn the helicopter’s nose into the direction of flight.
As you get more and more comfortable with this exercise, the idea will be to turn the nose into the direction of flight as soon as you start coming back so for most of the time while traveling back and forth from the left to the right and back again, the nose of the helicopter will be pointed into the direction of flight.
If you have a heading hold gyro that you can switch to yaw rate mode, this is where you might want to give that feature a try. Most people don't bother with it; but some people do find it makes things a bit easier because in rate mode, you won't have to command the tail rotor with as much authority as when it's in heading hold mode. As the RC helicopter starts moving, the weather-vane effect will naturally help the nose point in the forward direction with the tail following along.
It will be tempting to start flying forward with more and more speed, but resist that temptation at all costs – this is what will get you into trouble.
Just take it nice and easy flying back and forth in total control always staying 2-3 feet off the ground. As you get more and more comfortable with turning the helicopter at the end of each reach to come back, you will automatically start turning without stopping at the end of each reach and actually start flying a very skinny long figure 8 with the nose now always pointing in the direction of flight.
Congratulations, you are flying a circuit!
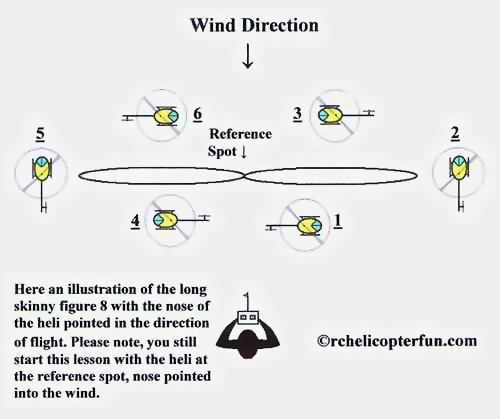
Here is a very important day 6 RC helicopter training tip for you.
When your helicopter is to the right of the reference point and you are turning the helicopter to come back to the left, always turn the nose to the left.
When you are on the left side of the reference mark and coming back to the right always turn the nose to the right.
This is very important so the nose is always turning away from you. If you were to turn left when coming back from the left, the nose of the helicopter would be turning toward you and unless you have practiced and mastered the nose in hover (day 10’s lesson) you will get disorientated very quickly and probably crash.
You must feel very comfortable with today’s RC helicopter training lesson before progressing to day 7.


