Blade Tracking & First Spool Up
by John Salt
Welcome to training day 2...
Today will be be going over blade tracking & your first spool-ups so the heli, and more importantly you, are all ready and prepared for day 3's lesson.
Spooling up the rotors the first time on a new RC helicopter is always exciting; but can also be scary, especially if you don't know what to expect. If you are progressing from a smaller coaxial, quadcopter, or micro heli, it can be quite intimidating the first time those larger rotors start spinning.
So, before getting into blade tracking and powering the bird up, lets talk about vibration a bit, specifically transitional vibration.
Helicopters have many spinning parts and therefore are prone to vibration. I am not getting into vibration analysis here since it is a huge topic on it's own.
What I want to get across is that during spool up, most if not all RC helicopters will experience vibrations to some extent, even though in the air, the heli is vibration free. Most of these vibrations that occur during spool up are considered to be "transitional" in nature, meaning they come and go as the rotor and tail rotor spool up and introduced different frequencies to different components on the heli.
Because everything has a "natural" or "resonance" frequency that it vibrates at, different parts of the heli can vibrate quite a bit when the rotors are first coming up to speed. You will generally first notice the entire heli wobble a bit as the rotor blades first start turning until the blades "spin out" to find their centers for example. This is why you should try your best to get the main rotor blades as straight out in the blade holders as possible before spooling and why blade bolt tightness ( as we discussed on day 1 ) is important.
Next you may notice the head or canopy start vibrating and then the tail fin or horizontal fin. Again, these vibrations, as long as they go away after the rotor head is more or less up to speed are very normal.
Applying Power
Now that you know what to expect, let's spool this rascal up. Very slowly and gradually!
If you give a large throttle command, several things can happen - none of them good.
The obvious one is the bird will take off the ground - not what you want (at least at this early stage in your learning process).
Second, a fast spool up can cause the main rotor blades to lag a great amount and completely throw the head out of balance, perhaps so much so, the heli will tip over from the large vibration produced.
Third, a fast spool up creates large amounts of reactive torque from the main rotors that will cause the heli to violently yaw since the tail rotor is not up to speed yet to correct it.
As I said, as you spool up slowly, you will notice some vibrations, but as long as you have built and setup your heli correctly, have the main rotors & head balanced properly, these vibrations will pass. You want to stop spooling up when you notice the helicopter starting to get light on the skids before it lifts into the air.
The added weight of training gear is helpful here and yes, you want them mounted on the bird before your very first spool up.
This is where you may need to change or alter your throttle curve, and maybe even your pitch curve if need be so the heli is more or less almost ready to leave the ground at about half throttle/collective stick.
ALMOST ALL collective pitch RC helicopters hover in the +4.5 to +5.5 degree collective pitch range so you need to ensure that there is also enough power being produced by the motor/engine to spin the rotors fast enough at that collective pitch angle to lift off the ground. Again, I go over all that and how to set it correctly in the Setup & Tips e-book .
Now it’s almost a 100% certainty that your cyclic trim will be off and require further trimming. The helicopter may want to drift left, right, forward, or backwards, especially if the swashplate was not leveled correctly during the setup .
These cyclic trim adjustments will be sorted out on day 3. If your RC
helicopter starts drifting, just reduce the throttle/collective stick a
bit to keep the bird solid on the ground. This is generally not an issue with flybarless as the cyclic gyros will automatically trim that out once airborne.
IN SHORT - DO NOT ADD ANY CYCLIC TRIM TO A FLYBARLESS HELI WHEN ON THE GROUND.
Doing so can and most likely will cause the swashplate to slowly drift/creep off level and before you know it, the swash is fully tilted in that trim direction you just clicked in and the heli will go for a wild ride as soon as it gets light enough to move.
Some nice thick grass will also help secure the heli from drifting around as you get light on the skids if you can find some. Just remember, if you have a nitro powered heli nitro exhaust will leave a small brown dead spot on the grass. If you have a female dog using the same lawn as her bathroom – you won’t even notice the new brown spots. If however you have a prize winning lawn – better perform your spool ups and power adjustments elsewhere.
Blade Tracking Adjustment
Before we get into blade tracking, you might want to know what exactly blade tracking is right? As I mentioned, most helis will hover around 4.5 to 5.5 degrees of positive pitch.
It is all but impossible to get both rotor blades at exactly the same pitch angle by using even the best pitch gauge.
Slight sighting errors and slop in linkages will always give slight reading variations between blades. Just pick one blade to take your pitch readings from and make sure the two pushrods or DFC arms that go from the upper swashplate up to the blade grips are both the exact same length.
Fine tuning that length is accomplished by setting the blade tracking afterward. Don't waste your time getting them both perfect on the pitch gauge. In fact, the tracking should be more or less perfect off the bench if you simply ensure the two pushrods or DFC arms the exact same length.
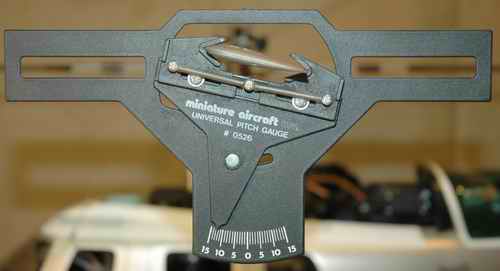
This picture shows a
standard pitch gauge and how you visually level it with the flybar
through the "windows" on either side of the gauge. Once leveled, you can
get your pitch reading.
Now what happens when the helicopter is about to lift off the ground or is in a nice solid hover if one blade has slightly more positive pitch than the other? You guessed it – the blade that has a little more positive pitch will be producing a little more lift. Because the rotor blades and rotor head have flex built into them, this blade with a little more lift will actually "fly" a little higher than the other blade. Yep, the blade tracking is off.
You can actually see this when looking edge on at the spinning rotor blades as the helicopter hovers or when it is on the ground getting light on the skids – you will see two distinct rotor discs. The blade that has a little more lift will be creating the upper rotor disc and the other blade the lower disc.
The above picture is a representation of what you would see by looking edge on the rotors while the helicopter is almost ready to lift off the ground or is hovering with out of track rotor blades. The blade with the red tape has a little less pitch/lift and therefore flies lower than the blade with the blue tape. They are about three blade widths out of track. This will cause a very noticeable vibration and must be adjusted so both blades fly in the same plane and look as one.
An RC helicopter that has out of adjustment blade tracking will vibrate and if the vibration is bad enough may even set up a harmonic oscillation that can be pretty scary. I have purposely set the blade tracking way out to experience this and some RC helicopters seem more susceptible to blade tracking induced oscillations than others. My guess is it has to do with the mass of the rotors or the natural resonance frequency of the rotor assembly – in any case, blade tracking is something you will want to set correctly.
Okay, you now know what blade tracking is and why it is important to have set right, let’s go back to your helicopter and check the blade tracking.
First off, you need a way to identify each rotor blade so you can tell which one is flying higher and lower. Some RC helicopter kits or helicopter blades will come with two different colored pieces of tape to put on each rotor tip (usually red and black). You can also use red and black electrical tape.
Now start up your helicopter and get it light on the skids.
You don’t have to be hovering, as long as the rotor blades are producing some lift, out of track will show up.
Next crouch down or have an assistant crouch down so you/he/she is looking edge on at the spinning rotor blades (blades at eye level). For obvious safety reasons you should be wearing impact safety goggles just in case. You also don’t have to be close to the helicopter, you will be able to see if the blades are out of track 10-20 feet away (on larger machines).
It will be easier to see both different colored blade tips as they are spinning on a sunny day with a dark background such as distant trees or mountains. If your blade tracking is set correctly, both colored blades will be overlapping – flying in the exact same plane. If your blade tracking is out, one of the blades will be flying higher than the other and you will be able to see both distinct blade tip colors.
Say the blade with the red tape is higher than the blade with the black tape. To correct this, spool-down and adjust the ball link reducing the pitch of the red blade as per your helicopter instructions. You could also increase the pitch of the black blade so it meets up to the red blade. If the adjustment is out a lot, I would recommend doing both – decrease the pitch on the red by one turn and increase it one turn on the black.
Now spool-up getting the helicopter light on the skids and recheck. Continue performing these tests and blade tracking adjustments until both blades colors overlap and appear as one blade.
Once you learn to hover, it wouldn’t be a bad idea to recheck the tracking again during an actual hover with the rotor blades at eye level. The tracking shouldn’t have changed, but there will be more load on the rotor and this might cause a very slight out of track condition. If so, simply land the bird, adjust the blade tracking as required, and recheck. You will also want to recheck your blade tracking whenever you replace rotor blades or perform maintenance/repairs to your rotor head.
After you perform the blade tracking adjustment, the tape can be removed if you wish. This tracking tape will sometimes start peeling off on its own after a while. You will most likely be pretty startled and confused when this happens because the rotor will start making a very strange and scary sound as the tape comes loose.
Ready For Day 3?
Now that you have your engine or motor and your blade tracking adjusted, it is time to progress to day 3 – learning the ground hover. Before we start on day 3 this would be a good time to perform a range check on your radio system if you haven’t already done so.
There are generally two ways to perform range checks these days with the different radio technologies available. For all older RC radios (AM, FM, PCM), the general practice is to collapse the telescopic antenna mast down to its lowest position. You should be able to walk about 30m (100 ft) away from your model before losing radio range.
2.4GHz spread spectrum radios don't have a long telescopic antenna mast of course. The general way to range check them is to hold down the range check button/switch. This reduces the power output of the radio and once again, you should be able to walk about 30m (100 ft) away from your model before losing radio range.
Follow your RC radio's instructions on range checking - these two methods will cover most radios out there, but there are always exceptions. Range checking is something you will do every day from now on when you go out flying, so get in the habit now.
Range check okay... onto day 3.


