RC Helicopter Radios - What Features To Look For
by John Salt - Updated September 2022
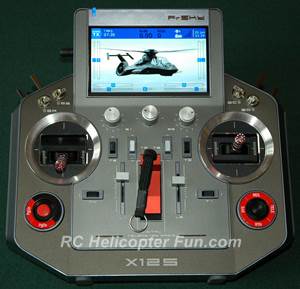 My Current RC Helicopter Radio (Horus X12S)
RC helicopter radios (transmitters) have some very interesting and different features & functions over that of standard fixed wing or multi/quad-rotor radios.
Time to learn about these features and why you can’t properly setup or fly a modern day collective pitch RC helicopter without most of them.
Yes - the radio is more important than the helicopter!
NOTE: This article is geared towards collective pitch RC heli radios, not little micro fixed pitch stuff that most of these RC helicopter radio specific features don't apply to.
“Can I fly an RC helicopter with my RC airplane radio?” I get this question a lot. The simple answer used to be "NO!"
Wait a minute... We are living in the 21st century now!
That was true 20+ years ago; but thankfully, we now we have computerized radios that include both heli, fixed wing, and quad/multi-rotor specific software built into them.
That is just another reason why I said on the RC radio gear page, you should only consider getting a computerized RC radio when getting serious about this hobby.
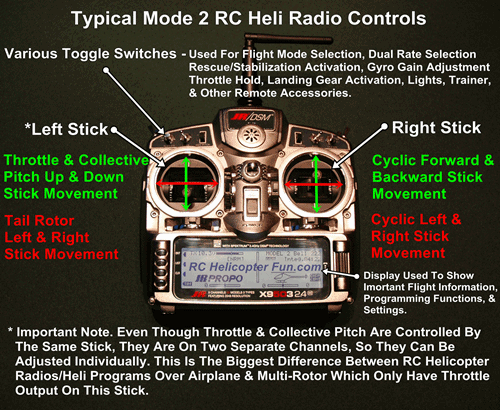 Basic RC Helicopter Radio Controls
The Eight Main RC Helicopter Radios Specific Functions
First and foremost to understand, is that the throttle stick (up/down movement) is used to control two functions; or in other words, two channel outputs are controlled with the up/down movement of the throttle stick.
This is the most important difference that an RC helicopter radio (or heli radio software) has over a fixed wing or multi/quad-rotor radio/software.
The collective pitch and throttle outputs are both controlled by the up/down throttle stick on the radio (the left stick on a mode 2 or 4 radio, the right stick on a mode 1 or 3 radio).
An airplane or quad/multi-rotor requires the throttle output alone to be controlled by the up/down movement of this stick.
Even though these two functions (throttle and collective pitch) are controlled with one stick, they are on two separate channels and take up two outputs on the receiver. One is the throttle output channel and the other is usually the auxiliary 1 output channel which on collective pitch, we usually call the "pitch" channel.
Why separate them? This question leads us into the first four RC helicopter radio specific functions that are dependent on this separation of throttle and collective pitch.
1. Throttle Hold
The throttle hold function will allow you to lock the engine throttle/speed at a pre-set value, usually idle or electric motor off while still having full control over the collective pitch using the combined throttle/collective stick. This function is usually activated by a toggle switch on your RC helicopter radio.
Why would you want this function?
If you are practicing auto rotations , you need throttle hold to lower the engine power down to an idle or turn it off, but still have full collective control on your main rotors to perform the auto rotation.
Throttle hold is also a very handy safety feature for both fuel and electric powered helis because it will prevent the rotors from spinning up if you accidentally bump the throttle stick on your radio when the throttle hold toggle is turned on ("throttle hold active"). Throttle hold, at almost all RC flying clubs is a mandatory setting that all RC helicopter pilots must ensure they have setup correctly.
2. Idle Up / Flight Modes
Idle up is used for the same reasons as throttle hold – to have full collective control using the combined throttle/collective stick, while the engine is set at a constant speed, this time a high or full speed setting. This handy function is used to keep the head speed more or less constant regardless of throttle/collective stick position.
It also allows aerobatics by keeping your rotor speed high, even while pulling the throttle/collective stick down low to give negative collective pitch. Without this "separation", the motor/engine would also be lowered but thankfully, that is not the case. The end result is you can now fly the heli upside down (inverted).
Once again, the idle up/flight mode function is usually selected by a toggle switch on the radio. Some RC helicopters radios have a multi position idle up toggle switch that allows you to set more than one idle up speed for more head speed flexibility (normal, sport, and 3D for example).
Computerized radios will take this one step further... The idle up (now called the flight mode switch) is used to select different throttle and pitch curves giving the ultimate in flexibility - our next topics.
3. Programmable Throttle Curves
Ah yes, throttle and pitch curves, the black magic of collective pitch RC helicopters to many, but it's really simple actually when you look at what each do separately.
A programmable throttle curve function simply allows you to program specific throttle output settings to specific throttle stick settings. The most basic and simple throttle curve is called a linear curve – the kind that all non computerized RC radios produce and what most people are very familiar with.
This would mean at low stick the throttle output would be 0% At mid stick the throttle output would be at 50%. At full stick the throttle output would be at a 100%.
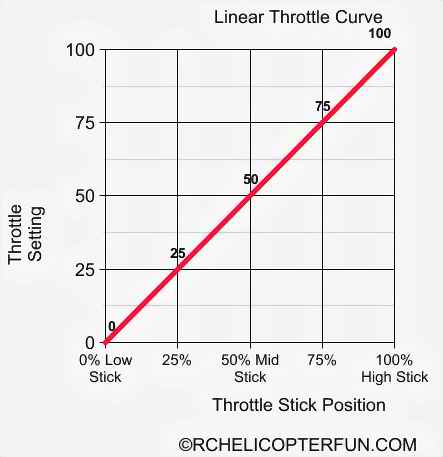
The above image show a graphical representation of a basic linear throttle curve.
Computerized radios will allow you to customize this curve so you can now set the throttle speed to whatever value you want at different throttle stick positions to enhance whatever type of flying you are doing.
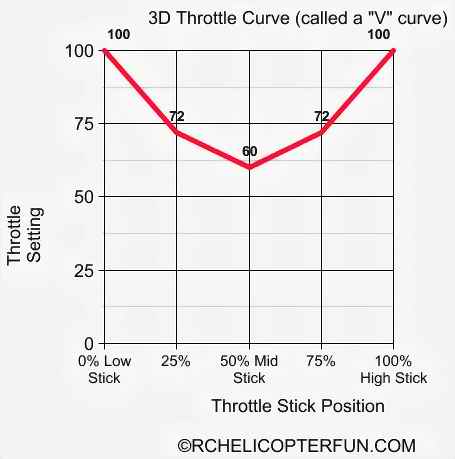
This graph shows an example of a throttle curve for full on aerobatic flying with a fuel powered heli. The throttle output at the low stick setting is set at 100% power to give maximum engine climb out power when the helicopter is inverted and using full negative collective pitch. At mid stick the power is set to 60% so the rotor head won’t overspeed with the reduced collective pitch rotor drag/loads. At full stick, the power setting is once again set to 100%, for the maximum climb out power with full positive collective pitch.
A good computerized radio will allow you to program at least 5 different throttle point settings throughout the range of stick movement - one setting at low stick, one at 25% stick, one at mid stick, one at 75% stick and the last one at full stick. This would be called a 5 point throttle curve.
A good computerized RC helicopter radio will also allow you to see this information on a graph, just like the ones pictured above. This is important in case you mess up on one of the settings, it will be very easy to identify a curve programming blunder if you can see it visually.
4. Programmable Pitch Curves
Programmable pitch curves work the exact same way as programmable throttle curves – they allow you to program specific collective pitch angles to specific throttle stick settings.
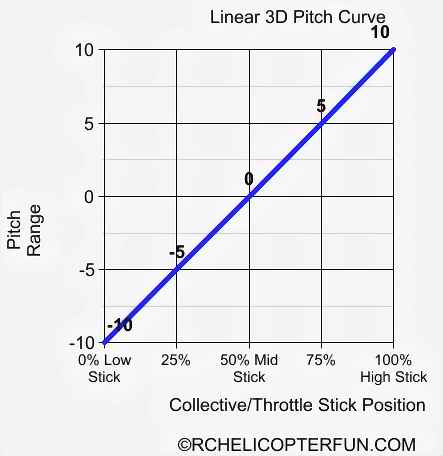
The graph above shows a linear pitch curve on a RC helicopter that has a maximum and minimum collective pitch of plus and minus 10 degrees. At low stick the pitch angle will be negative 10 degrees. At half stick the pitch angle will be 0 degrees. At full stick the pitch angle will be plus 10 degrees. This would be the kind of pitch curve an aggressive 3D heli pilot would use; but certainly not one a newbie learning to fly would be using.
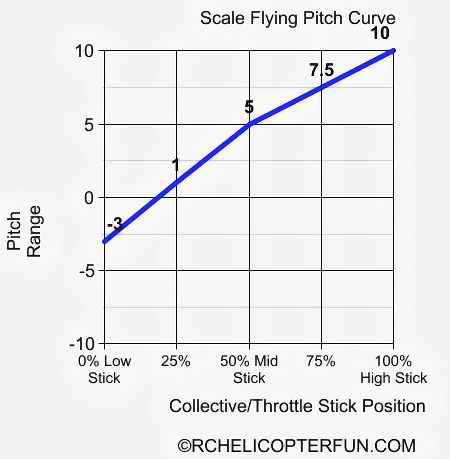
Here is a more docile pitch curve for normal or scale type flying. It produces negative 3 degrees of pitch at low stick, plus 5 degrees at half stick, and plus 10 degrees at full stick. Still a little too aggressive for learning on, but hopefully you get the idea.
Once
again, just like programmable throttle curves, a good computerized RC
helicopter radio will show the pitch curve on a graph for the same
reasons and have at least 5 setting points – this would be called a 5
point pitch curve.
Programmable throttle and pitch curves have caused much confusion over the years; especially for those new to collective pitch RC helis. The main problem I see is first realizing that both throttle and pitch curves are completely separate from each other and that you almost always need more than one of each for several specific areas of flight. Next up is a simple lack of understanding of what you are actually trying to achieve with each one.
The whole idea behind pitch and throttle curves is to produce the right amount of power for a given pitch angle, at specific throttle stick positions based on your flying style, the various flight modes you want, and the machine you are flying. If you think of them that way; pitch and throttle curves should start to become a little less black magic, and more science based reality.
Keeping things simple, I generally set my pitch curves first. Most heli kit instructions will include the recommended pitch settings for different types of flying. I then set my throttle curves to give smooth and steady power throughout the collective pitch range. Like I said before, having this information displayed graphically on your radio is a big feature. You always want nice smooth pitch and throttle graphs, no erratic values or sudden changes.
In short - Smooth pitch and throttle curves produce smooth flying birds.
My Setup & Tips eBook covers all this in much more detail and shows you exactly how to setup your pitch and throttle curves, how they work, and different ones for different flying styles from tame to insane.
If setting up collective pitch RC helicopter curves is giving you trouble, this eBook should answer all your questions and likely many you never even considered asking before.
Click on the image if you wish to learn more about what's inside.
5. CCPM Mix Programming
CCPM (cyclic collective pitch mixing) is a very important computerized RC helicopter radio specific function. Electronic cyclic collective pitch mixing was only made possible by computerized RC radios after all.
Most RC helicopter radios will offer at least 90° and 120° CCPM mixing modes. Some higher end radios will also offer others such as 135° and 140° CCPM mixing.
Most of today's flybarless systems do the CCPM mixing externally on the helicopter, so this specific RC helicopter radio feature is not used as much these days unless your FBL unit doesn't offer internal mixing (the Align 3G & 3GX come to mind), or you still rock a flybar.
Regardless of whether the mixing is done internally within the radio or externally in the FBL system, CCPM mix programming is another of those "mystery" RC helicopter functions that cause many a newbie CP pilot much head scratching and web searching.
Yep, I wrote an eBook to help out with that as well if you're interested in learning more about it.
6. Tail Rotor Compensation / Revolution Mixing
The next RC helicopter radio specific function is Tail Rotor Compensation. This is also called revolution mixing by many people/radio manufacturers.
As we talked about in the helicopter theory section on the torque control page , the reactive torque loads on the heli change when the throttle & collective are increased and decreased.
Tail rotor compensation as the name suggests compensates for this. Basically this function mixes additional tail rotor pitch to compensate for the added torque when the throttle/collective stick is increased. Like wise, it reduces the tail rotor pitch when the throttle/collective is decreased.
On non computerized RC helicopter radios, this function is controlled by two dial knobs, one for up mixing and one for down mixing. The up setting is used to adjust how much the tail rotor pitch is increased as the throttle/collective stick is increased. The down setting is used to adjust how much the tail rotor pitch is reduced when throttle/collective stick is decreased.
On a computerized RC helicopter radio, this function is programmed on a menu screen in the same way – a mixing value for up and one for down. Good radios will have two and sometimes three different settings for different types of flying such as normal, sport, or 3D.
Tail rotor compensation settings are adjusted by trial and error and are never perfect - but they are better than nothing.
Once again – technology is making this function obsolete. You only have to use tail rotor compensation with a yaw rate gyro . If you are using a heading hold gyro in the heading hold mode, tail rotor compensation is never used – the gyro handles the changing torque and does so with much more precision than the best tail rotor compensation settings ever could.
In addition to that, you must never use tail rotor compensation if you are using a heading hold gyro – make sure your compensation dials or settings are set at zero. If not, the compensation will send tail rotor commands to the gyro. The heading hold gyro will see these commands to turn the heli and it will do just that.
7. RC Helicopter Radio Gyro Gain
The gyro gain function uses a radio channel and toggle switch to remotely change the amount of gain on the tail gyro. The gain output can be adjusted from 0 to 100% based on what gain setting you wish to use on your specific gyro.
Generally you will have at least two selectable amounts of gain for different head speeds/tail speeds, and/or have the ability to toggle between heading hold or rate mode gyro operation as all modern day gyro's are put into the different modes of operation by the gain channel output.
Most computerized radios allow you to assign the gain channel output to a specific toggle switch. You might like it assigned to your rudder dual rate toggle, your flight mode toggle, or a separate toggle if you want to switch between rate and heading hold mode.
8. Head Gain, Flight & Rescue Modes, & More
The last main RC helicopter specific radio functions that comes to mind are selectable flight & rescue modes, head gains, and governor speed adjustments. These are all fairly new RC helicopter features that you will find on better flybarless systems and brushless speed controllers (ESC).
Just like the remotely adjustable programmable gain settings for the tail gyro, you can also have the ability to remotely set the gain settings for the head gyros in some flybarless systems.
Other radio outputs could be used to put the flybarless unit into rescue mode by activating accelerometers to level out and/or upright the helicopter. More options allow you to change the amount of "stabilization help" the flybarless controller offers, or alters how reactive/responsive the helicopter controls are.
For those that fly multi-quad rotors, these functions are likely already very familiar to you. Same goes with fixed wing that are also now using electronic stabilization systems. In short, these are not really RC helicopter radio specific features per se, but they are worth mentioning only because they were first seen on RC helicopter flybarless systems/controllers, before they migrated over to the other forms of RC aviation.
RC Helicopter Radio Recommendations
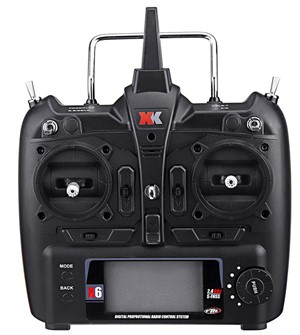
If you are just getting into this hobby, are on a tight budget, and are looking for a good entry level computerized RC helicopter transmitter that offers all the important functions and features that I have just talked about - the 6 channel XK X6 computerized radio is hard to beat for the low cost. I wouldn't use it however on anything much larger than a 200 to 250 size RC helicopter.
If you know however you are going to either start with or eventually progress into larger collective pitch RC helicopters (larger than a 250 size) or Blade brand helicopters; you'll want to consider a higher end entry level radio such as the Spektrum DX6e. The DX6e has all the important RC helicopter functions, but isn't overly complicated and is quite easy to use.
There are certainly other good RC helicopter radios to consider of course. Those two above are just solid and popular choices, along with being fairly easy to use.
Here is my page that talks about more computerized RC helicopter radios and covers various features to consider if you are interested in learning just what is out there and how different brands compare.
The learning curve is already a steep one when getting into collective pitch helicopters, and having an easier to use computerized radio will keep that curve manageable.
On the opposite side of the easy RC helicopter radio spectrum are the new generation of OpenTX RC radios. If you are contemplating an OpenTX transmitter as your first RC helicopter radio, I encourage you to watch the video below...


