Nitro Fuel Tank Tips
by John Salt
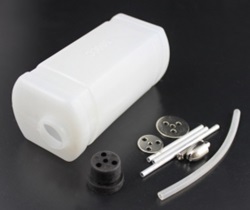 Nitro Fuel Tank Components
Nitro RC Helicopters or any nitro model uses nitro fuel. Naturally, we need a fuel tank to contain the fuel – pretty simple right?
Yep, but there are many things to consider like size and placement of your fuel tank, to the ways it is vented and refueled.
Most model engine nitro tanks are generally made from polyethylene plastic that is opaque so you can keep an eye on your fuel level. I can’t think of one nitro RC helicopter kit that doesn’t come with the fuel tank and fuel tank hardware as part of the kit; so you shouldn’t have to purchase one separately.
If you do however, or have to replace one, make sure you get a tank big enough to give you at least a 10 min flight.
All nitro engine instructions will specify their fuel consumption generally indicated in ounces or milliliters per minute. It is an easy matter of calculating the size of fuel tank you need to get a 10 min flight or so.
Always get the biggest fuel tank you can fit into your nitro RC helicopter (assuming it doesn’t throw your center of gravity off too much). When you are learning to hover or just flying around, you want long flight times. Once you get more advanced and want a lighter heli to perform 3D tricks – simply don’t fill the tank up as much.
Nitro Fuel Tank Placement
Another fuel tank item to consider when purchasing your nitro RC helicopter is where the fuel tank is located. The very best location is directly under the main rotor shaft. If your fuel tank is in this location the center of gravity (GC) of your helicopter will remain constant throughout the flight as the fuel is used up.
Of course because of engine lay outs, this is not always possible. If the tank is not right under the main rotor shaft it should be as close as possible. The further forward or behind the rotor shaft, the more you will notice the GC change throughout the flight as fuel is consumed.
Nitro Fuel Tank Clunk
For those of you in the RC airplane world this is nothing new, but it might be a new term or idea for those of you with nitro RC cars, truck, or boats.
RC aircraft fly in many different attitudes – meaning pointing up, pointing down, on their sides, and upside down... not to mention the high G forces pulling the fuel to one side of the tank or the other.
If the fuel pick up was at a fixed location in the tank – say the lowest part of the tank like in a car – the aircraft would only get fuel when it is flying straight and level. Any banking or inverted flying would starve the engine of nitro fuel.
A very simple solution of using a short length of fuel tubing inside the fuel tank with a heavy weight at the end of the tube called a "CLUNK" ensures no fuel starvation. This tube and clunk will simply flop around inside the fuel tank which ever way gravity pulls on it - just like the fuel in the tank. This means no mater what the RC aircraft is doing, the pick up end of the fuel tube in the tank is always submerged in fuel.
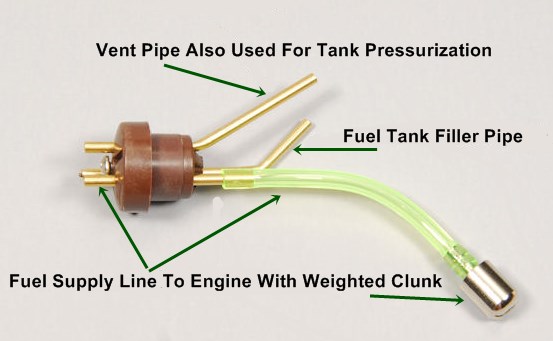 Nitro Fuel Tank Plumbing Components Including The "Clunk"
This clunk, more specifically the fuel tube it is hooked up to inside the fuel tank should be checked for deterioration every year or so.
The tube over the years will get brittle and may crack or come off the supply tube in your fuel tank. This of course means you now have a fixed nitro fuel pick-up and all the benefits of the clunk are lost.
Pressurizing Your Fuel Tank
All RC nitro model engines benefit from a pressurized fuel tank but none to the extent of radio controlled helicopters.
A pressurized fuel tank will assure your nitro engine is always getting a stable fuel flow no matter what the fuel level.
Without pressurization, the fuel mixture may lean out enough during your flight to the point where the engine dies out.
This is the most common reason to use a pressurized nitro fuel tank with all nitro engines but for flying RC aircraft there are several more important reasons.
To understand these reasons, we must first understand a little bit about fuel tank venting.
All fuel tanks from your car to your lawnmower have vented fuel tanks, this not only allow excess gas pressure to escape, but also ensures the tank doesn’t build up a vacuum as fuel is drawn out by the engine – this is called vacuum lock. If fuel tanks were not vented, the fuel flow would simply stop – air must be allowed into the tank to take up the space the fuel once occupied.
The fuel vent is always placed at the highest point in the fuel tank; the obvious reason is to prevent the fuel from blocking and spilling out the vent. For most conventional fuel tanks like on a lawnmower, this vent is simply installed in the fuel filler cap – the highest point on the fuel tank.
Ok - back to RC aircraft now, especially ones that do aerobatics. If we are flying upside down or any position that causes the fuel to be higher than the vent hole, what happens? Yup, fuel blocks and leaks out the vent. If this condition remains, a vacuum will build in the nitro fuel tank. The engine will usually start running lean at this point and will eventually be starved of fuel.
It would take some time to create enough vacuum in the tank to starve the engine, but certainly less time than is experienced in sustained inverted flying or inverted hovers.
A pressurized tank solves these problems by pushing exhaust gas pressure into the vent. Even if the vent is covered by fuel, the exhaust pressure will prevent a vacuum from forming in the fuel tank or allow fuel to leak out the vent.
Pressurizing you nitro fuel tank is very easy and inexpensive. Most if not all nitro engine mufflers come with pressure fittings or a threaded hole that a pressure fitting can be screwed in to. Simply connect the pressure outlet on the muffler to the vent outlet on the fuel tank with some silicone fuel tubing - you now have a pressurized fuel tank.
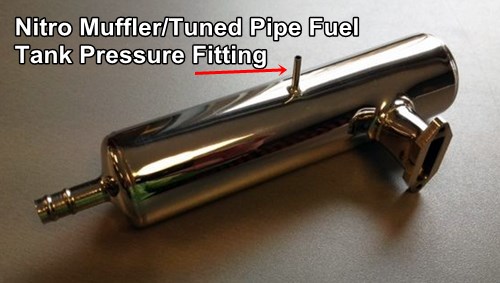 Typical Fuel Tank Pressure Fitting On Nitro Muffler/Tuned Pipe
This also ensures that no dust or dirt will be drawn into the fuel tank through the vent. Not a major concern for RC helis or RC airplanes, but a huge benefit for RC cars and RC trucks that run in dusty conditions.
I must point out that for a pressurized RC fuel tank to work, it must be a closed system. By this I mean the vent inlet from the muffler and the fuel outlet to the engine must be the only two openings in the tank.
If you have a separate fill vent tube, the system pressure will simply escape through the second vent. I have seen a few people make this mistake with RC nitro cars, boats, planes, and helis. You can have a separate fill line; just make sure it is plugged off after filling.
Refueling Your Nitro Fuel Tank
I am not going to go into the various devices used to add fuel to your tank such as pumping or using a fuel bulb or squeeze bottle. I want to talk about the correct method of refueling your nitro RC helicopter, or any nitro model for that mater.
Never refuel through the vent in a closed system!
If you try to refuel through the vent, you will be pressurizing the fuel tank with fuel so much so that you simply won’t be able to pump anymore in. The other concern is the high pressure created in the tank will force the fuel into, and completely flood out your engine.
If you try to start an engine that is full of raw fuel, you run the risk of hydro locking the piston and bending the connecting rod or piston pin if you have a strong enough starter.
Always refuel through the fuel supply line going to the engine or through a dedicated refueling line that can be closed off to prevent venting and spilling. This allows the air in the fuel tank to be displaced through the vent as fuel enters during refueling .
Filtering Your Nitro Fuel
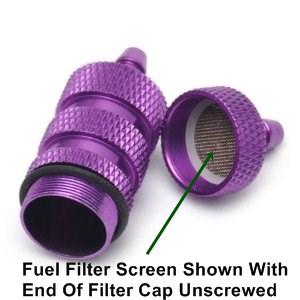 Nitro Fuel Filter
I highly recommend that you filter the fuel before it goes into the fuel tank.
There are many little nitro fuel filters on the market.
They are very simple in design using a very fine mesh screen inside; most can be opened up and cleaned as needed.
Our little nitro engines have very small needle valve openings; it doesn’t take much to block them. Filtering your fuel before it even gets to your tank will ensure particulate free fuel. You could also place a fuel filter between the fuel tank and engine for even more filtering.
Keep in mind if you use this method of filtering, you will have to refuel by a separate refueling line or refuel between the tank and the filter. If you refuel from between the filter and the engine, you will back-flush the filter into the tank and any dirt it catches from your fuel bottle will be on the engine side of the screen.
As soon as the engine starts drawing fuel, any particles caught in the filter will now flow into the carburetor of your engine; completely defeating the purpose of using the filter in the first place.


