Understanding The Heading Hold Gyro
by John Salt
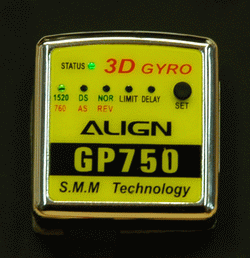
The heading hold gyro (also called the Heading Lock Gyro) takes the dampening of the simple yaw rate gyro (YR) to another level.
I should point out this article covers both stand alone heading lock tail gyros and those that are built into flybarless stabilization systems.
Heading Hold gyros have sophisticated software that enables them to calculate exactly how many degrees the yaw or heading of the heli changes.
This calculation is then converted into a direct command sent to the tail rotor servo that not only dampens the movement, but corrects for the exact amount of deviation off the original heading of the helicopter.
Basically the heading is locked or held – thus the name heading hold gyro. This type of Control Feedback Loop is know as a PID control loop.
A strong crosswind in this case will not slowly turn the helicopter to point into the wind as it would with a yaw rate gyro due to the weathervane effect. The heading hold gyro will keep the heli pointed in the same direction until you give a tail rotor command to turn the helicopter to a new heading no matter how strong or gusty the cross wind is.
In other words the HH gyro and its sophisticated software have total control over the tail rotor servo at all times. It will keep the locked in heading no mater how much the wind blows or the torque of the main rotor changes. The only time the helicopter will yaw left or right is when you give it a command to do so.
Heading Hold Gyro Set Up
Now that you understand the differences between how HH and YR gyro operate, it is easy to see why there has been much confusion between the two systems and how they are set up. Tail rotor compensation/revolution mixing is not used with a heading hold gyro since the gyro’s PID control loop algorithms correct for changes in reactive torque automatically.
For example, if you have your tail rotor compensation turned on, the HH gyro would see this as a tail rotor command to change the heading and would start turning/yawing the heli.
It is therefore very import to have any type of tail rotor compensation/mixing turned off. The heading hold gyro will take care of torque compensation with robotic precision - much better than the best tail rotor compensation settings ever could.
It is also very important to ensure you have no rudder main or sub trim, both have to be centered. I cover tail setup in great detail in my Setup & Tips e-book. The following video is a nice basic primer of HH tail setup and shows the main items to be aware of.
No more tail rotor compensation to worry about – life has been made so easy with HH gyros. Tail rotor control has never been easier and more precise. Good heading hold gyros can be switched to operate in yaw rate mode as well. In most cases this can be done remotely on your transmitter.
Why would you want to turn the heading hold function off? Keep reading...
Heading Hold Gyro Limitations
For some types of flying, it is actually beneficial for the helicopter to naturally turn into the direction of flight due to the weathervane effect - something that won't happen when you are in HH mode. When you are practicing your forward flight lessons on Day 6 , having your Gyro switched over to rate mode, may help you out. The helicopter will turn in the direction of flight with very little tail rotor commands - the tail will simply follow along.
The other minor issue with a HH gyro that may take you by surprise is just how good they want to lock onto a heading and stay pointed in that direction. This is great once you are flying, but can cause some interesting times during take off.
What can happen? Well when you turn your HH gyro on, the first thing it does is initialize and lock onto the heading the heli is pointed in. Now as you carry your RC helicopter out to the take off area, you might change the direction it is pointing in from that of what the gyro locked onto.
The gyro is now going to try to yaw your helicopter back onto its original heading as soon as enough tail rotor speed is built up and the helicopter is getting light on the skids. As long as you increase your throttle/collective slowly, you will have time to correct for this unwanted yaw movement with a tail rotor command.
For example, just before I lift off, I'll give a little bit of left & right tail rotor to make sure the tail is responding correctly and is more or less locked on heading before I leave the ground. This way, there will be no "yaw drama" as I leave the ground. I just thought I should mention this as it can be startling if you are not expecting it.
Heading Hold Gyro Benefits For Aerobatics
Before the HH gyro was available, RC helicopters could not obtain fast backwards flight because the weather vane effect would spin the heli nose first in the direction of flight quicker than a yaw rate gyro or a good pilot could correct for. Heading hold gyros are able to keep the weathervane effect from happening in fast backward flight, or in the gustiest of cross winds as long as they are able to correct the tail rotor pitch fast enough.
This leads us to the tail rotor servo and how important it is when used with a heading hold gyro.
Fast Digital Tail Rotor Servos
You will notice that good quality heading hold gyros will recommend using digital tail rotor servos; some may only work with a matched specifically designed digital tail rotor servo or come as a combined gyro/servo set.
Why - because for any gyro (YR or HH) to function properly, the servo must be able to control the tail rotor as fast as the gyro can calculate and correct for the heading change.
In short, the faster a heading hold gyro can process and send signals to the servo, the faster the servo has to be in order to keep up with the lightning fast gyro commands.
The end result is a RC helicopter that will have a tail so locked during all phases of flight, it will seem like it is glued in the air.
This is where there is some misunderstanding and misinformation right now. Many think that if you are just a novice or scale flyer you don’t need a fast tail rotor servo since you won’t be controlling the tail rotor quickly. Remember however, you are not controlling the tail rotor, the gyro is… and for it to do a good job, the servo should be as fast as the gyro.
So why digital? After all, there are some fast analog servos out there. This is explained in depth in the Radio Gear section on the Servo page . The short answer is simply because digital servos are able to attain full speed and torque almost instantaneously when they are given a signal to move.
Analog servos on the other hand take a while to achieve full speed and torque when given a command. Even the fastest analog servo will be at least five times slower than a standard speed digital servo during the first few degrees of movement. Since the gyro is sending small movement commands to the tail rotor servo in both directions many times per second - instantaneous speed and torque are so important.
A slow servo would always be trying to catch up to the gyro, the tail will end up wagging and hunting even with the gyro gain/sensitivity turned down.
This is why some of the best and fastest gyros on the market such
as Futaba’s GY601 HH gyro are designed to only work with the
specifically matched digital S9251 servo that it comes with.
To Sum Up
A lower quality HH gyro paired with a fast digital servo, will outperform the best HH gyro paired with a slow analog servo. Follow the gyro manufacturer’s recommendations for the best digital servo to use and you won’t go wrong.
You probably realize that getting a heading hold gyro is a much wiser choice than a simple yaw rate gyro. From simple set up and ease of control for the beginner, up to advanced aerobatics for the pro flyer – HH gyros have opened a new door in RC helicopter control. What a great time this is for our hobby!


