E-flite's Blade CX3 MD 520N Coaxial RC Helicopter Review
by John Salt
As a scale RC heli guy, the Blade CX3 is the coaxial RC helicopter I had been waiting a long time for, especially since I like the MD520N so much.
I still have my CX3 in 2023, and it remains to be one of my favorite micro coaxial RC helicopters to fly inside the house on those cold winter days even after owning it for 14 years now. It still flies great and has lasted much longer than even I expected!
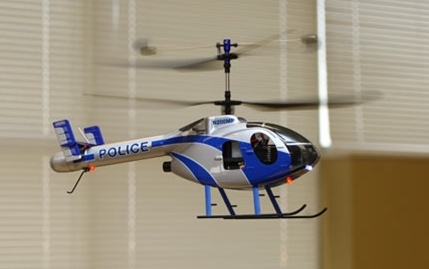 Blade CX3 MD520N Scale RC Helicopter
The scale MD Helicopters 520 N (NOTAR) fuselage in police scheme looks outstanding and makes perfect sense for a coaxial. As you know, coaxial helis don't have tail rotors, what better scale fuselage to put on one than a MD 520 NOTAR (no tail rotor). E-flite has done it again and come up with an exciting winner out of the gate!
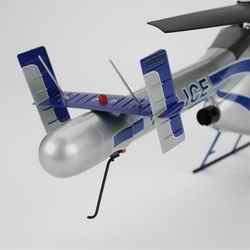 Blade CX3 Tail Details
The detail on the Blade CX3's MD-520N fuselage is nice! From the foot pegs on the landing struts to the fluting on the horizontal and vertical stabilizer fins, right down to optional LED strobe navigation and search lighting.
A very well done scale job; and seeing that this is a stable coaxial RC helicopter, anyone will be able to fly it with ease.
Blade CX3 Features
The Blade CX3 comes in two versions. A RTF (ready to fly) kit and a BNF (bind and fly kit). Both versions come standard with:
- The MD 520N Coaxial RC helicopter - set up and test flown
- A quality DC balancing charger
- An 800 mAh 2 cell 7.4V Li-Po battery
- An advanced 3 in 1 control unit that controls the lift, mixing of rotors for yaw control, and Heading Hold Gyro functions.
- Lightweight Spektrum AR6100e receiver with DSM2 technology
- Two feather light S60 Super Sub-Micro servos (6 grams each)
The Ready to Fly version comes with an interference free 5-channel E-flite transmitter with built-in Spektrum 2.4GHz DSM2 technology. The Bind & Fly version doesn't come with the radio for those of us who already have a Spektrum or JR DSM2 radio. Seeing that I have Spektrum's DX6i (that came with my Blade 400 ), I obviously decided to order the Bind & Fly version.
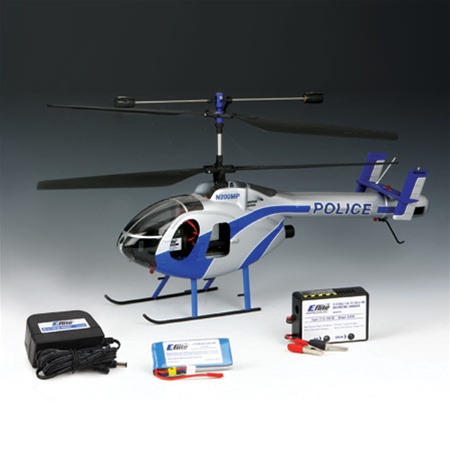 BNF Blade CX3 Kit Contents
The single best feature the Blade CX3 has going for it is it uses most of the same mechanical parts from the very popular Blade CX2. What does that mean for you and me? Lots of parts support and a proven flight and reliability record.
Blade CX3 First Impressions
Out of the box, the Blade CX3 looks fantastic. For a small micro coaxial RC heli, the detail is very well done.
The first thing that will catch your eye is the nice paint job that is entirely scale.
This is a polycarbonate fuselage that has been finished from inside which gives an outstanding shine and depth to the finish.
The front windows have actually been glued in place and have been lightly tinted with a grey/bronze tint to add to the overall scale appearance.
The side door windows are simple cut outs that remain open for cooling and component access.
There is a seam line where both halves of the fuse have been joined and a seam line around the boom’s tail cone, but for a micro RC heli fuselage, this is normal.
4 holes are already pre-drilled into the Blade CX3's fuselage (two on the boom, and two on the lower nose) to accept the optional navigation LED kit . This upgrade is worth every penny and looks great.
All lettering, NOTAR intake mesh, and NOTAR boom exhaust ports are stickers. For those of you who don’t want a police schemed 520N, the “POLICE” stickers can be removed from the tail boom – with extreme care. The landing struts are fairly strong for a scale micro heli and mine have seen some pretty heavy landings without incident, but they are certainly much less forgiving than those found on the CX2.
The weakest scale detail on the CX3 are the landing strut foot pegs. I broke two off before I figured out a good way of installing the Li-Po pack (I have my recommended battery procedure on my CX3 Tips & Help page . I replaced all four foot pegs with small pieces of carbon fiber rod - these foot pegs are not going anywhere now.
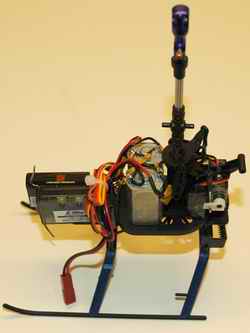 Blade CX3 Mechanics
The mechanical components look just like the guts in a Blade CX2 – no surprise there seeing that they share most of the same components.
Of course the big difference is the new 3 in 1 unit that uses heading lock gyro circuitry.
Then there is also the Spektrum 6 channel AR6100e DSM2 receiver. A fairly decent park-flier type receiver for a small micro indoor coaxial.
Flying The Blade CX3
Set-Up
As you know, I purchased the Bind-N-Fly version of the Blade CX3 and set it up on my Spektrum DX6i. The binding procedure is simple, but the instructions that came with the CX3 didn’t include any of the settings to program in the various fields to get this thing flying. In short, it took a while to get things sorted.
My CX3 Tips & Help page goes through all the settings that I used as well as some of the issues that I had with my first few flights that required some adjustments to the values.
First Flights
With everything set up correctly it was time to start putting the Blade CX3 through the paces, and pace this rascal I did. Inside, outside, forwards, backwards, sideways, pogos, pirouettes, you name it, I did it.
Now with over 75 flights to date and not one problem to speak of (other than the broken foot pegs that were my own fault) the CX3 has seen more flight time in two weeks then any other RC helicopter I have ever owned (in the same time frame). I think that speaks well for both the quality and the fun factor. It actually has been a bit too fun and prevented me from getting this review done sooner – too much time flying instead of writing.
Like all of E-flite’s coaxial micro RC helicopters, the CX3 is super stable. If you are in motion, just let go of the cyclic stick and the CX3 settles nicely into a solid hover. When you are use to collective pitch single rotor birds, this actually takes a while to get use to since it seems way too easy.
I admit, flying a micro electric coaxial is certainly not as exciting and won’t get the heart rate, but a nice relaxing flight can be just as rewarding and fun. Nothing like a stress free after dinner flight in the living room with a crackling fire and a blizzard raging outside – almost sounds romantic doesn’t it? Ok, that is pushing it a bit; once helis and romance start coming up in the same sentence, I think I better start looking for a new hobby or seek professional help.
Gryo Performance
It took a while to get the gyro adjusted properly with limited coaxial tail twitch (a very common issue with all electric micro coaxial helis). Again, my Blade CX3 Tips & Help page goes into more detail of the process and the settings I used to get the best gyro performance.
The heading lock gyro circuitry in the 3 in one unit is well suited to a micro electric coaxial helicopter. It won’t correct the heading if you push the helicopter off course with your hand; but in brisk backward and sideways flight there was little if any weathervane effect encountered. I was amazed at how well the gyro held sideways flight with the large surface area of the NOTAR tail boom and large stabilizer fin.
Scale Flight Appearance
Sure, it's fun to fly, but the main reason the Blade CX3 is getting lots of stick time is pretty obvious – it looks fantastic! It’s hard to describe just how neat it is to finally be able to fly a good looking scale heli inside the house. No matter what approach or departure angle you view it from, it doesn’t disappoint!
As a scale heli guy, I know this probably is more exciting to me than someone who could care less, but I don’t think many would argue that this is one of the best looking coaxial micro RC helicopters going. The fact that it flies so well is icing on the cake. I can’t wait to get that remote LED nav light kit installed to add to the overall scale appearance.
Flight Times
The battery that fits the CX3 is E-flite's 800 mAh, 2 cell, 7.4 volt Li-Po - same as in the CX2. Center of gravity is critical on micro coaxials so battery size and position shouldn’t be messed with. I am always looking for more flight time but the 800mAh 7.4V pack that comes with the CX3 is satisfactory.
I have no idea where the 10-15 minute flight times listed on the box that the CX3 comes in are from? I’m getting on average 8 minutes of flight time out of a fully charged pack. The most I got was almost 11 minutes with a stationary hover flight. The shortest flight I got was just over 5 minutes by performing pirouetting pogos for the entire flight. Flying outside with lots of full range cyclic control generally gives a 7 minute flight and more gentle indoor flying gives around 9 minutes.
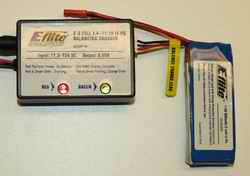 Blade CX3 2S LiPo Battery Charging
The battery charger that comes with the Blade CX3 is a nice little two or three cell balancing charger. Yes, you can charge 2-cell 7.4V or 3-cell 11.1V Li-Po’s via balancing taps.
The charger comes with a 120VAC wall adapter so you can charge from any electric house outlet, or you can use the alligator clips to charge batteries out at the field or remote locations by hooking the charger to a 12 VDC battery. It takes about 2 hours to fully charge the 7.4V 800 mAh battery with this charger.
Flying Outside
 Flying The Blade CX3 Outdoors - Looking Good For A Micro Coaxial
E-flite’s coaxial micro RC helicopters can of course be flown outdoors, but it has to be dead calm! Right now here in the Canadian Rockies, it is the dead of winter, damn cold, and windy almost every day. I somehow convinced my wife on Valentines Day no less, to venture out in the -15C temperature for a photo shoot of this little beast in action.
The cold didn’t bother the Blade CX3 at all (wish the same could be said for the pilot and photographer); in fact, the denser air seemed to give a little more lift. During this first of several cold outdoor flights, a slight breeze came up and made life a little interesting for the CX3.
It was hard for the CX3 to make headway into the wind, but it did much better than the little mCX. If you do take your CX3 (or any micro coaxial) outside, make sure you have your dual rates turned off. If there is a breeze, you will need every bit of cyclic to produce enough directional thrust to overcome the wind. Otherwise, your CX3 could slowly drift away just like a balloon. Best advice, wait for a dead calm time of day.
Flying Inside
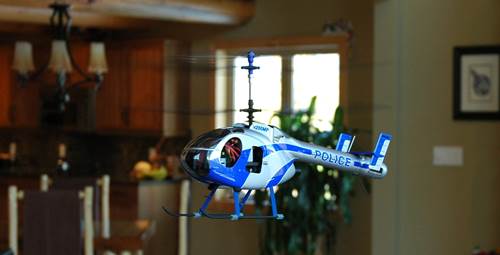 Blade CX3 Flying Indoors - Still Looking Good ;-)
Of course, the whole reason I got the Blade CX3 in the first place was to fly it indoors. I have had some nice outdoor flights and can’t wait for it to warm up a bit outside to get more outside flight time in; but indoors is where the CX3 shines. The CX3 needs room to fly if you want to fully appreciate it.
This is where the mCX might be a better choice if your space is limited. Our living room is 30 feet by 16 feet with 25 foot high vaulted ceilings and I am having a ball flying the CX3 in this amount of space, but if I had more room, I could certainly use it. A gymnasium would be ideal!
The CX3 just like the CX2 can fly much faster than the mCX and in a 10x10 room or smaller, although the CX3 is still fun, the mCX is the better choice because of the lower performance potential.
The biggest problem with the CX3 is those 7-9 minutes pass by way too fast. I guess time truly does fly when you are having fun.
Recommendations
By now, you probably know the Blade CX3 is high on my list if you're in the market for a scale micro coaxial RC helicopter and would recommend it to anyone; but just like I say on my Best RC Helicopter Page “the best heli for me, might not be the best heli for you”.
Because the CX3 boasts a detailed scale fuselage it is more fragile than the CX2 or mCX. There is nothing wrong with this; for us scale RC heli people, that is all part of the appeal. I have a section on my Blade XC3 Tips & Help page that explains the procedure of removing the scale fuselage to give you a better idea of what’s involved. It’s not hard, but if you don’t really care about scale detail and the extra care required, than the Blade CX2 may be the better choice.
If this is your very first RC helicopter and have a smaller indoor area to fly in, the Blade mCX or the Blade mCX2 will suit you and your flying area better. The CX3 is a bit harder to fly than the mCX's, and is more fragile. Add to that the additional weight, size and power; the CX3 can certainly do more damage to both the helicopter and the surroundings if you hit something.
Lastly if you like scale RC helicopters or just like the MD-520N helicopter and want an easy flying indoor micro coaxial, the Blade CX3 is the ticket!
It has unfortunately been discontinued, but you can still find them on eBay or fit the MD520N fuselage onto a Blade CX2.


